Icemaker Repair Guide
Do you need assistance in icemaker repair? This refrigerator repair guide can
walk you through the steps it takes in repairing your icemaker. These are the
same steps I take when repairing appliances professionally. So if you follow
these steps your problem will be solved in no time. Take the time to read each
section carefully until your icemaker is repaired. Before you get started you
should first jump the icemaker and note what it does before continuing. click
here to learn how to jump
icemakers.
Here are some other icemaker repair pages you might find useful.
When preforming icemaker repair it is important to know how much ice the icemaker should produce. Icemakers typically dump once every 1-2 hours An icemaker that dumps once an hour has strong icemaker production and an icemaker that dump once every 2 hours is weak but still acceptable.
So in 24 hours, the icemaker should make approximately 80-175 cubes. Typically it will take 24-48 hours for an icemaker bin to fill and longer if the refrigerator is just starting up. If your icemaker is producing ice but slowly, the first thing to check before going through troubleshooting steps provided on this page is the temperature in the freezer. The temperature should be around 0-10 degrees. Note that if you are taking air temperature, the door of the freezer should be closed for at least 30 minutes before reading temperature.
If you don’t have a thermometer, a good indication that the temperature in the freezer is acceptable is ice cream. If the ice cream is hard the temperature is acceptable and if the ice cream is soft read the next section.
TEMPERATURE IN FREEZER TO WARM
Icemaker repair may not be necessary first check the temperature in the freezer.
When the temperature in freezer is to warm this can cause the icemaker not to work. I don’t get this very often because if the temperature was too warm most people will be more worried about their food than their ice. But it’s the first thing you should think of because you don’t want to go working on the icemaker if your freezer is just not cooling. If you think its not cooling properly, click here to find out more about you cooling problem. refrigerator not cooling
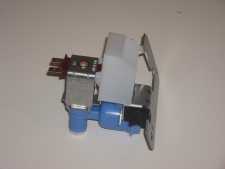
REFRIGERATOR WATER VALVE
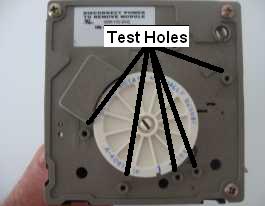
This section of the icemaker repair guide talks about the feeler arm. If the water valve is bad, the icemaker can’t make ice. If you have an icemaker with an electronic head (icemakers that are in most refrigerators not made by GE) you will have holes that are marked T, V, L, H, M and N. What you want to do is make a jumper wire (just a wire about 4 in. long skinned about ¾ on each end) now insert on end of your jumper wire in the V hole and the other in the L hole. If you did this properly, the water valve should come on. If it doesn’t come on, replace valve and look to see if the fill tube (the tube that the water comes in the icemaker) is stopped up with ice. If it is you still need to replace valve because its what caused the tube to stop up.

But first you need to clean out the fill tube. You do this by pulling the tube out the back of the refrigerator (some just pull out, some twist out, some have screws) then you can get the ice out with hot water.
If the water does come on when you put the jumper wire in, pull the jumper wire out and the water should stop and if the water doesn’t stop, replace valve.
If you don’t have an icemaker that has an electronic head, you will need to jump-start the icemaker click here to find out how. After you jump-start it, it should start going through the cycles. If there is any ice in the icemaker it will dump it. (Hint: if there is ice in the icemaker, the water valve is not bad) After it dumps, the valve will come on. If the icemaker completes the cycle and does not run water, replace valve. Don’t forget to check the fill tube I talked about above. Water valves can be found at AppliancePartsPros.com.
 |
 |
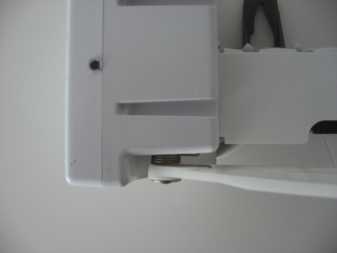
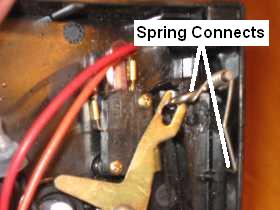
FEELER ARM
This section of the icemaker repair guide talks about the feeler arm. The next thing you need to check is the feeler arm (the arm that feels for ice and stops the icemaker when it feels some). If you don’t have a Whirlpool refrigerator that has the ice bin in the door then you have a feeler arm. Some feeler arms go up and down some go side-to-side. In any case it should have a spring like action. So if you lift the arm up it should spring down as long as you don’t lift to high. Doing so will turn the icemaker off. Same thing with the feeler arms that go side-to-side, if you push it, it should spring back. If it doesn’t spring back, the spring is either broke or out of place. If the spring is out of place, you can simply slip it back and be done.
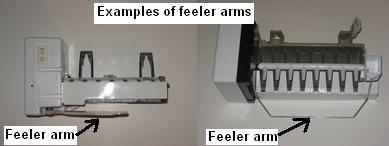
Icemaker repair can be as simple as slipping a spring back
in place. The pictures below show two different types of springs on icemakers.
 |
 |
On icemakers that have the electronic head, (most icemakers not made by GE) if the spring breaks you have to replace the head, but the head almost costs as much as the whole icemaker. You might want to replace the icemaker. Here is a good website to check out AppliancePartsPros.com.
On GE and some other brands that have an arm that goes up and down, the spring often breaks or slips out of place. I don’t think you can buy replacement springs. I have been taking them off of scrap icemakers when I need one. So you may have a hard time finding one. Hopefully it is just out of place. Sometimes the arm jumps out of the hole and you may be able to move it back and forth to get it back; otherwise, you need to take the icemaker apart.
If you have a new GE with an arm that moves from side-to-side, the spring often comes out of place I have never seen one broken. You should be able to slip it back with a small screwdriver. If not, you can remove the arm by taking out the screw. Then you should be able to put the spring in place and reinstall the arm.
ICEMAKER CYCLE
When performing icemaker repair sometimes you have to observe the icemaker cycle. For the icemaker to work, it must go through the cycle. To determine if the icemaker is going through the cycle, first you need to note where the rake arm (the arm that rakes the ice out) has stopped. If it stopped in the middle of the cycle, then the gears may be broke. You may be asking, “How do I know if it stops in the middle of the cycle?” Well if the arm is in the ice molds (Where the water freezes) or straight up, then it’s in the middle of the cycle. If you have an icemaker with an electronic head and it stops in the middle of the cycle, replace the head. (Note that the head cost almost as much as the icemaker so you might want to replace icemaker). Here is a good website to check out AppliancePartsPros.com. If its pointing kind-of toward the back of the icemaker or toward the front its good.
Now, if you have a GE or some other brands that the feeler arm goes up and down, the gears may be broke. When taking the front cover off, you should see two gears (if you only see one, you have an electronic head I talked about above). Sometimes the small gear slips forward, if so, put some Lock Tight on the shaft and push it back on. If some of the teeth are missing off one of the gears it needs replacing, but as far as I know, you can’t get the small gear. I have been getting it off of junk icemakers for years. But, you can get the big gear, so you can replace it. Now, if it didn’t seem to be stuck in the middle of the cycle, then you need to jump-start the icemaker. Once you jump it, it should go through the cycle. If it goes all the way through the cycle and runs water, then replace the icemaker (provided the temperature in freezer is within range 0-12 degrees Fahrenheit).
If you have a newer GE with the feeler arm that goes side-to-side and its stuck, won’t go through the cycle, and the light is flashing, this may be due to a bad water valve. A built-in electronic board runs this icemaker and it makes three attempts to fill the icemaker. If there still is not enough water in the icemaker, it locks its self up and the light flashes. In this case, turn off icemaker for 30 seconds then turn it back on then refer to the section where I talk about water valves. Icemakers can be found at AppliancePartsPros.com.
I hope this page helps you with your icemaker repair.
Return Form Icemaker Repair Guide