GE Icemaker Repair Guide
In this GE icemaker repair guide I will walk you through the steps in repairing
your GE icemaker. GE has two style icemakers and they are old mechanical style
and the newer electronic style. Repairing these two icemakers is very different
from one to the other and this GE icemaker repair guide will explain each one in
detail.
When repairing icemakers it is important to know how much ice the icemaker
should produce. Icemakers typically dump once every 1-2 hours An icemaker that
dumps once an hour has strong icemaker production and an icemaker that dump once
every 2 hours is weak but still acceptable. So in 24 hours, the icemaker should
make approximately 80-175 cubes. Typically it will take 24-48 hours for an
icemaker bin to fill and longer if the refrigerator is just starting up. If your
icemaker is producing ice but slowly, the first thing to check before going
through troubleshooting steps provided on this page is the temperature in the
freezer. The temperature should be around 0-10 degrees. Note that if you are
taking air temperature, the door of the freezer should be closed for at least 30
minutes before reading temperature. If you don’t have a thermometer, a good
indication that the temperature in the freezer is acceptable is ice cream. If
the ice cream is hard the temperature is acceptable and if the ice cream is soft
check out this page Refrigerator
Not Cooling
Old Mechanical Style No Ice
In this
section of the GE icemaker repair guide I will discuss the Older mechanical
style icemakers. Note that GE doesn’t make many (they come of a few model
refrigerators) these icemakers anymore and is replaced with the electronic
icemakers.
The first thing you should check are the gears on the front of the icemaker. To access these gears; remove the front cover off the icemaker. Note that on some side-by-side refrigerators the icemaker is installed sideways and you will have to unhook it to remove this cover. Once the cover is off, inspect the gears and if any of the teeth are missing they are bad and needs replacing. Also check to see if the small gear has slid forward enough to miss the big gear. If so, put a small drop of lock tight on the shaft and push the gear back on.
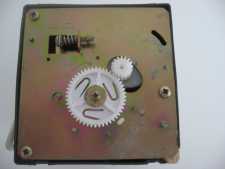
These are the part numbers for the gears.
Big Gear WR29X5162
Small Gear WR29X5153
Fill Tube
The next thing you should do is look at the
fill tube to see if it is clogged with ice. If it is clogged with ice, pull it
out the back of the refrigerator and clean all the ice out with hot water. The
water valve causes this problem so replace the water valve or it will happen
again.
Feeler Arm
The feeler arm is the wire arm
that shuts the icemaker down then it hits the ice. There is a spring inside the
icemaker head that will force the arm back down after the motor lifts it up. If
this spring is broken the arm will not come back down to push the switch as if
it were hitting ice, shutting the icemaker off. To check this spring lift up on
the feeler arm and then let it go, it should fall back down as if a spring were
pulling it. If not the spring is broken.
Jump-Start
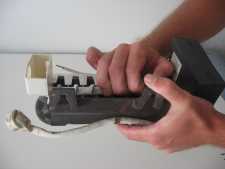
Next thing you should do is jump-start the
icemaker. To do this pull on the rake arm as shown below until the feel arm
starts to move up. Then let go of it and the icemaker should continue on its
own. What should happen is that the icemaker should go through a cycle, the
feeler arm should lift up and water should run in. If it completes the cycle and
stops and no water enters the icemaker, the water valve is bad and needs
replacing. If the icemaker will not complete the cycle replace the icemaker. If
the icemaker completes the cycle and water runs in either the temperature inside
the freezer is too warm (should be between 0-12 degrees) or the thermostat
inside the icemaker is bad. Note that I recommend changing the entire icemaker
if the thermostat is bad.
Refrigerator ice makers on sale - Whirlpool, Kenmore, GE and
others.
Old Mechanical Style Overflowing
In this section of the GE icemaker repair guide I will discuss what to do when
they overflow. Note that the gears mentioned above can cause this icemaker to
overfill running water all in the freezer. Also check the fill tube as described
above because this can cause the same problem.
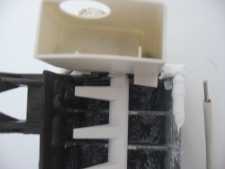
Sometimes water will enter
the icemaker too fast causing the first cube-mold to overfill before the water
gets a chance to run to the other cube-molds. To fix this problem remove the
cube separator and run a bead of RTV (silicone) at the top of the first cube
mold as shown below. Then reinstall the cube separator and the problem should be
fixed. Note that if this is the problem it will only be a small leak; a few drop
of water per cycle. If you are getting lots of water overflowing the water valve
is bad and needs replacing.
If you didn't find your problem here this page may help Advanced GE Icemaker
Repair For GE mechanical icemakers.
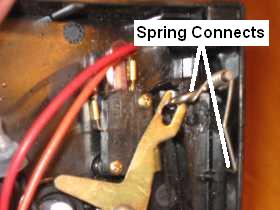
Electronic Style No Ice
In this section of this GE icemaker repair guide I will discuss electronic icemakers. This is just about the only type of icemaker GE makes anymore and will replace the older mechanical style icemaker. Note that you cannot get parts for this icemaker so it’s either the icemaker or the water valve. But sometimes the spring that makes the feeler arm retract after pulls it in (shown below) will come out of place. If this is the case, replace it and your icemaker should be fixed.
If its not the spring turn the icemaker off (some have a switch and some you
will have to unplug) for at least 30 seconds. Then turn it back on and press in
on the feeler arm three times within 15 seconds of turning the icemaker back on.
If done correctly the icemaker will go through a cycle and run water. If it goes
through a cycle and doesn’t run water, the water valve is bad assuming the water
supply from your house is ok. Also check to see if the tube going to the
icemaker is clogged with ice. If so, pull the tube out the back of the
refrigerator, remove the ice and replace the water valve. Note that on
side-by-sides you will have a water filter that can cause this but if you have
good water pressure through the door the filter should be ok.
If when you
do this, the icemaker will not go through the cycle replace the icemaker. Also
note that sometimes the icemaker will go into a lockdown mode for unknown
reasons. Cutting it off for at least 30 seconds will reset it and it may go back
to work. So if the icemaker completes the cycle and runs water it may just start
working again provided the temperature in the freezer is ok (between 0-10
degrees).
Icemaker Making Too Much Ice
This section of the GE icemaker repair guide talks about electronic icemakers that make too much ice. This also applies to some newer mechanical icemakers with this type of feeler arm.
There is an arm (you might look at it as a paddle) on the side of the icemaker called a feeler arm. This arm moves back and forth to “tell” the icemaker when the ice bin is full. When the feeler arm touches the ice it’s supposed to stop indicating that the ice bin is full and the icemaker will stop making ice.
But in some cases the feeler arm will not stop so the icemaker continues to make ice, causing this problem. GE recognized this problem and made a special feeler arm that is curbed so that it will stop when it reaches the ice and the icemaker will stop making ice. This part is easy to install, just remove one screw to remove the old feeler arm making sure you don’t loose the spring. Then just reinstall the new arm. Make sure the spring is in place or the icemaker will not work. The part number for this feeler arm is WR49X10103 .
I hope this GE icemaker repair guide helps you repair your icemaker!!
Refrigerator ice makers on sale - Whirlpool, Kenmore, GE and
others.
Return From GE Icemaker Repair Guide