Microwave Repair Guide
Warning
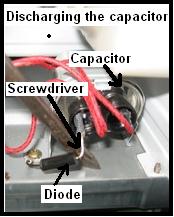
Microwave repair can be dangerous! You must unplug the microwave before attempting to repair it because they use very high voltage on certain internal parts. After the microwave is unplugged you must also discharge the capacitor before servicing because the high voltage that the microwave operates on is stored in the capacitor. To manually discharge the capacitor, place an insulted handle screwdriver between the diode connection of the capacitor and ground. It should discharge itself but always discharge it manually!
In this page, I will be walking you through the steps in Microwave repair. These
are the same steps I take when diagnosing Microwaves professionally. Read each
section carefully and follow the steps until your problem is fixed! Your
Microwave will be repaired in no time!
Microwave Runs but Don’t
Heat
In this section of my microwave repair
guide, I will walk you through the steps in repairing a microwave that won’t
heat.
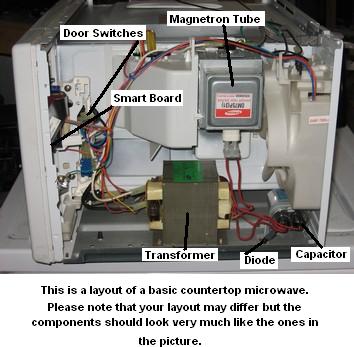
Magnetron Tube
The magnetron tube is the
most likely cause for this problem. Most magnetron tubes are guaranteed for ten
years, so check your owner’s manual before you start because if it is in
warranty, you should call a warranty repairman. If it isn’t in warranty, follow
these steps to determine if the magnetron tube is your problem. First,
disconnect power from the microwave. Then remove the case by removing all the
screws around the edge of the back. Once off, you should see the magnetron tube
- remove it. On the backside of the magnetron, you should see the tube then look
inside the tube. If it’s burnt looking it is bad and needs replacing. If it is
not burnt, it still might be bad, so follow the rest of the sections. If no
other parts that are checked are bad, then replace the magnetron tube.
Magnetron Test
This section requires you to test voltage with the microwave running. Use
this information at your own risk. Applance-repair-it.com is not responsible for
any damages see disclaimer.
Above I describe a way to visually check the magnetron tube to see if it is
bad. However this is not a 100% accurate test. Testing the magnetron tube is
more or less a process of elimination. The first thing you will have to do is
test to see if there is voltage going to the high voltage transformer when the
microwave is running and “calling” for heat. If there is voltage going to the
transformer you know the problem is in the high voltage side. Test the capacitor
and the diode as described below and if they are ok replace the magnetron tube.
If there isn’t voltage going to the transformer the problem is more than likely
the smart board.
Magnetron tubes can be purchased at AppliancePartsPros.com. If you have a GE spacemaker Microwave that needs a magnetron
tube this page will help GE
spacemaker magnetron tube replacement
Diode
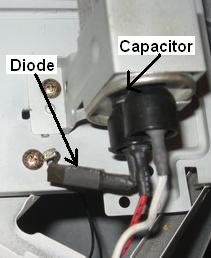
The diode is an electrical device that only allows electricity to pass one
way. The diode is located on the capacitor. To check the diode, first disconnect
power then unplug the diode from the capacitor and unscrew it from the frame.
Then set your ohmmeter to the closest setting to 50,000 ohms. Then check ohms
between the two ends of the diode. The diode should read nothing one way and
somewhere around 50,000 ohms the other way. If the diode is bad it will read
near zero ohms either way or nothing both ways. Note that some ohmmeters will
not read 50,000 ohms so it will appear to be bad when you perform this test.
Also note that if the diode is bad in most cases, the magnetron tube must be
replaced. Diodes can be purchased at AppliancePartsPros.com.
Capacitor
Capacitors do not go
bad often but to check this, first disconnect power. Then remove all the wires
from the capacitor. Then use your analog ohmmeter and between the two terminals,
if the capacitor is working properly the needle on the meter will move up a
little then back down. If you reverse the leads it will do it again. If you have
a digital ohmmeter it must have a capacitor tester in order to test this
capacitor and it should read around 15 microfarads. Capacitors can be purchased
at AppliancePartsPros.com.
Smart Board
The smart board can
cause this problem as well but is not that common. There is not an easy way to
check this so only change the smart board if you don’t find any of the other
parts in this section bad. Smart boards can be purchased at AppliancePartsPros.com.
Microwave Won’t Run

In this section of my microwave repair guide, I will walk you through the steps
in repairing a microwave that won’t run.
Fuse
If
your microwave won’t run, the most likely problem is the fuse. To check the
fuse, first disconnect power then remove the case by removing screws around the
edge of the back. Once off, you should see the fuse, remove it. Then using your
ohmmeter, check to see if you have continuity across the fuse. If not, the fuse
is bad and needs replacing. If the fuse is blown, check the monitor switch as
described below. If you do have continuity, reinstall it and move to the next
part. Fuses can be purchased at AppliancePartsPros.com.
Door Switches
Microwaves have three door
switches, a primary interlock switch, monitor switch and a secondary interlock
switch (sometimes called a sensing switch).
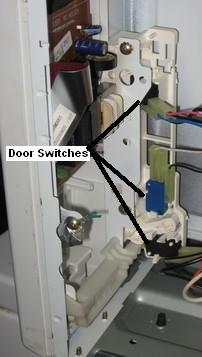
These switches often go bad and are an easy do-it-yourself microwave repair.
The monitor is almost always in the middle and the other two vary from model to
model but don’t worry the procedure for checking them is the
same.
Primary Interlock and Secondary Interlock
The primary
interlock and the secondary interlock are the top and bottom switches and the
procedure for checking them are the same. First, disconnect power and discharge
capacitor. Then remove the wires from both of them and using an ohmmeter, check
the switches. If the switches are working properly you should have continuity
between the two terminals with the microwave door closed it should and it be an
open circuit (no continuity) with the door open. Test both switches the same.
Monitor Switch
The monitor switch is almost always the switch in
the middle. If the monitor switch fails, the fuse may blow. To check the monitor
switch, disconnect power and discharge the capacitor. Then remove the wires from
the switch. Using your ohmmeter check the switch. If the switch is working
properly it should be the exact opposite of the other switches. It should be an
open circuit (no continuity) with the microwave door closed and with the door
open it should have continuity. Door switches can be purchased at AppliancePartsPros.com.
Safety Thermostat
If the safety switch is bad this will be an easy
do-it-yourself microwave repair. Most microwaves have a safety thermostat that will cut off the microwave if
the microwave gets too hot. Usually it is located on top of the microwave. You
will have to remove the case of the microwave to access it. To check it,
disconnect power from the microwave. Then remove the wires from the thermostat
and check for continuity across it with an ohmmeter. If it is open replace it.
Smart Board
The smart board can cause this
problem as well, but is not that common and there is no easy way to check. Only
change this if you don’t find any of the other parts in this section bad. Smart
boards can be purchased at AppliancePartsPros.com.
Again I can’t stress this enough Microwave
repair can be dangerous! You must unplug the microwave before attempting to
repair it because they use very high voltage on certain internal parts. Also
always be sure the capacitor is discharged before servicing because the high
voltage that the microwave operates on is stored in the capacitor. To manually
discharge the capacitor, place an insulted handle screwdriver between the diode
connection of the capacitor and ground. It’s should discharge itself but always
discharge it manually!!
I hope this microwave repair guide
helps you repair your microwave and save money.
Return From Microwave Repair Guide