GE Dryer Disassembly Guide
GE dryer disassembly is not hard and with the help of this guide it is simple. I
hear a lot of people say, “if I knew how to take it apart I would fix it.” That
is why this page was created, to help you with your GE clothes dryer repair.
Dryers are pretty simple machines so with a little guidance your dryer will be
repaired in no time. Note that this page is for GE dryer disassembly only, if
you need help with diagnosing the problem; refer to my dryer repair guide for
help.
Removing the Top and Front
The first thing you will have to remove to make any repairs is the top and
front.
1. Disconnect power from dryer. Note that this is for safety but also if you
disassemble a GE dryer without disconnecting the power, you will short out the
heating element.
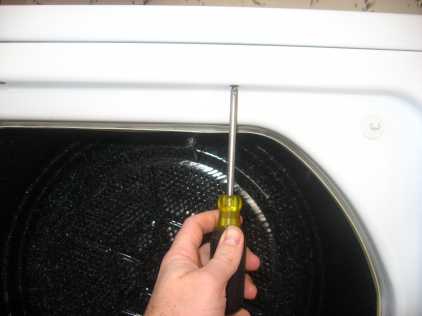
2. Remove the screws inside the door that point upward.
3. Lift the top up and off. Note on some models once the top is up you will have
to shift it to the left to release it.
4. If you are working on a very old model, you will have to loosen (don’t
remove) two 5/16 screws at the bottom. Note that if the dryer front goes all the
way to the floor, your dryer is newer so skip this step.
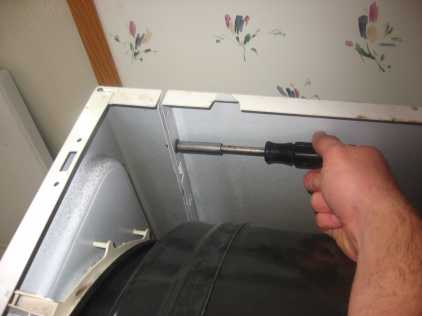
5. Remove the
screws on the inside top that point forward.
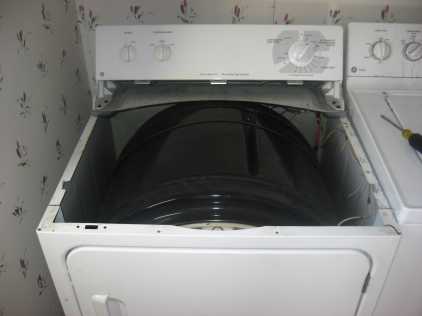
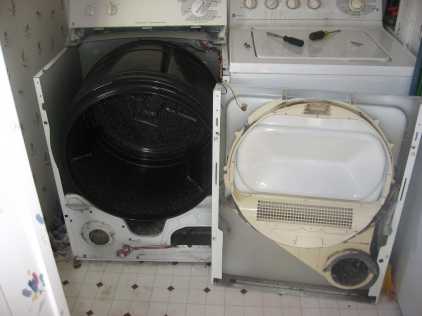
6. Once the screws are out, the front should lean forward. At this point you can
either disconnect the wires from the door switch or you can swing the front off
to the side without disconnecting the wires. Some dryers do not have enough
slack in the wires to do this so you will have to disconnect the wires. Be sure
to note how the wires connect to the switch.
Removing the Drum and Belt
The next GE dryer
disassembly step involves removing the drum and belt.
Follow steps 1-6
7. Lift up on the drum and reach under and disconnect the belt. Note that
some models have an access panel on the back that will allow you to disconnect
the belt from the back if it is easier for you.
8. If you are working on
a very old GE dryer, the drum shaft is held on by an e-clip on the back. There
will be an access panel on the back in the center. Remove it and remove the
e-clip. They haven’t used this clip since the 80s or early 90s so this is
unnecessary for most models.
9. Once the belt is loose and the e-clip is
off (if used), the drum should come forward and out. Note that it may seem like
the drum will not come out of the case, sometimes you have to spread open the
case just a little to allow the drum to come out of the case.
Belts and
any other parts you may need for GE dryers can be purchased at AppliancePartsPros.com.
If you need help reinstalling the belt this page will help Dryer
Belt Installion Guide
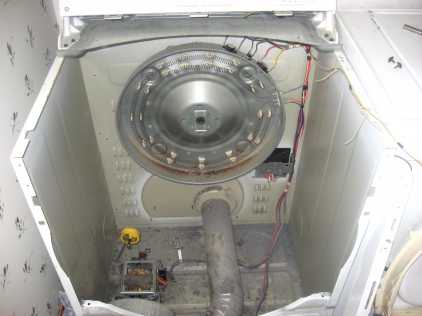
Removing the Motor and Blower Wheel
Should you need to remove the motor or blower wheel, follow steps 1-9 then
follow these additional steps.
10. Remove cover off the duct to allow access to the blower wheel.
11. Loosen the screw that holds the blower wheel in place. Once the
screw is loose you should be able to work the blower wheel off the motor shaft.
12. Once the wheel is loose, remove the motor by removing the clips that
hold the motor in place.
Motor and blower can be purchased at AppliancePartsPros.com.
Alternate Motor and Blower Wheel Removal
Some models are different from what I describe above, in which case this is how you would remove the motor and blower.
1. Loosen the screw that holds the blower wheel on.
2. Loosen the
clamp that holds the motor onto the blower wheel housing.
3. Take the
clamp loose on the backside of the motor. 4. Pull the motor out.
5. If
you need to remove the blower wheel you will have to remove the blower wheel
housing by removing the screws that hold it in from the back.
Motors and
blower wheels can be purchased at AppliancePartsPros.com.
I hope this GE dryer disassembly guide helps you repair
your GE dryer. Note that as you perform GE dryer disassembly be sure to clean
all the lint out of and off of all parts as best as you can. This will prolong
the life the dryer.
Return From GE Dryer Disassembly Guide