Dryer Belt installation Guide
In this Dryer belt installation guide, I will walk you through the steps for
installing a belt on GE dryers, Maytag dryers and Whirlpool dryers. Dryer belts
are often the first things that will go wrong with a dryer. When working on
dryers always inspect the dryer belt and if it is cracked or any of the grooves
are missing it is wise to go ahead and change it. Below are descriptions on how
to replace a dryer belt along with dryer belt diagrams to help you understand
how the belt connects. Note that the belt diagrams below are the view
that you would see if looking from the back of the dryer. With the exception of
the first Whirlpool dryer belt diagram, it is the view from the front.
GE Dryer Belt Installation
In this
section of this dryer belt installation guide, I will describe how to install a
GE dryer belt.
1. Disconnect power from dryer.
2. Open the door
and remove the screws in the door pointing upward.
3. Once done, the top
will either lift up or you will be able to remove the entire top depending on
how old the dryer is.
4. Once the top is up, remove the two screws that
point forward. That should allow the front to lean forward.
5. Lift the
front up and remove it. Note if the dryer is older you may have to loosen the
two 5/16 screws at the bottom before the front will lift up.
6. Once the
front is off you can reach under the tub and unhook the belt by pulling the
idler pulley to the right. This will relieve the tension on the belt so that you
can remove it from the motor pulley.
7. Now you are ready to install the
new GE dryer belt.
8. Wrap the dryer belt around the drum with the
grooves of the belt facing down towards the drum.
9. Pull the belt
around the drum several times to ensure it is not twisted. Note that if the belt
is twisted it will more than likely jump off the first time you turn the dryer
on.
10. On older dryers there is an access panel on the back of the
dryer that will allow you to see the motor and idler pulley. I recommend
connecting the belt through this access hole.
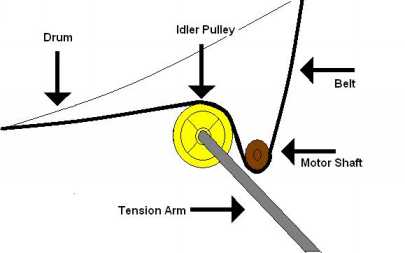
11. If there is not an
access panel on the back of the dryer, you must connect the dryer from the
front. Reach under the drum and connect the belt to the motor pulley. Then pull
the idler pulley to the right and loop the belt on the idler pulley. I usually
do this in two stages, first I loop the belt on the idler pulley shaft then
reposition my hands to get a better grip then pull the pulley again to loop it
around the belt.
12. Reassemble the dryer.
You can find GE dryer belts at AppliancePartsPros.com.
The dryer belt diagram below should help.
Whirlpool Dryer Belt
Installation
This section of the dryer belt
installation guide will describe how to install a Whirlpool dryer belt. There
are two common types of Whirlpool dryers. One has a lint trap on the top of the
dryer and the back of the dryer can be removed (although not necessary to
replace the belt) and the other has the lint trap in the door and the back
cannot be removed.
Lint Trap On Top
This section of this dryer
belt installation guide will discuss how to replace a dryer belt on a whirlpool
dryer with the lint trap on top. If you have a Whirlpool dryer with the lint
trap on top and the back can be removed follow these steps.
1. Remove
the lint trap and remove the screws under the lint trap.
2. Pull forward
on the top and at the same time lift up on the top.
3. Remove the screws
pointing forward and remove the front.
4. Pull the idler to the right to
release tension from the belt and unhook it from the motor pulley and remove the
belt.
5. Now you are ready to install the new belt.
6. Wrap the
belt around the drum with the grooves down toward the drum.
7. Pull the
belt around the drum several times to ensure the belt isn’t twisted. Note that
if the belt is twisted, it will jump off the first time you turn the dryer on.
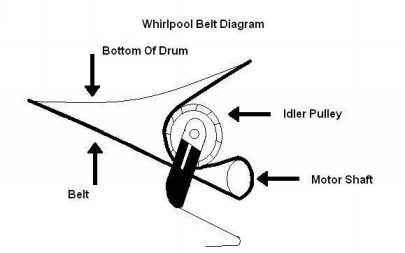
8. Pull the idler pulley up and to the right then feed the belt through
the idler pulley bracket and around the motor pulley.
9. Reassemble the
dryer.
Belts for this Whirlpool dryer can be purchased at AppliancePartsPros.com.
The diagram below should help.
Lint Trap In Door
This section of this dryer
belt installation guide will discuss how to replace a dryer belt on a whirlpool
dryer with the lint trap in the door. If you have a Whirlpool dryer with the
lint trap in the door and the back cannot be removed follow these steps to
replace the belt.
1. Disconnect power from dryer.
2. Remove the
bottom front panel by pressing in on the clips in the crack under the door.
3. Hinge-up the control panel. Depending on the model you might have to
remove two screws on each end of the control panel or press in on two clips.
4. Remove the top by removing the screws under the front panel. On some
models you don’t hinge the control panel up, you just press in on two clips at
the front (between the front and the top) to release the top.
5. Unplug
the door switch.
6. Remove the two screws pointing forward that hold the
front on.
7. On some models you will have to remove screws that hold the
air-duct to the blower. Others you just have to remove a clip at the bottom of
the air-duct.
8. Once the front is off the reach under the tub to unhook
the belt by pulling the idler pulley up and to the left to release tension on
the belt so that you can remove it.
9. Wrap the belt around the entire
tub with the grooves down.
10. Pull the belt around the tub several
times to ensure that it is not twisted. Note that if it is twisted it will jump
off as soon as you turn the dryer on.
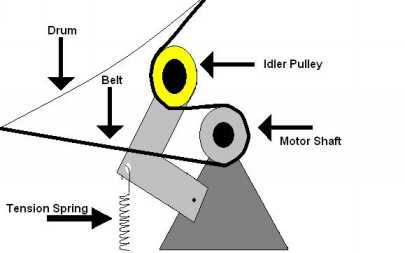
11. Wrap the belt around the
motor.
12. Then pull the idler pulley up and to the left and connect it
to the belt.
13. Reassemble the dryer.
You can find belts for this Whirlpool dryer at AppliancePartsPros.com.
The diagram below should help!
Maytag Dryer Belt Installation
If
you have an older Maytag dryer follow these steps in replacing the dryer belt.
Note that this doesn’t include Amana style Maytag dryers or Whirlpool style
Maytag dryers.
1. Disconnect power from dryer.
2. Remove the front panel by removing
two screws at the bottom or pressing in on two clips under the front panel and
pulling out on the bottom of the panel until the top clips release. Note if you
don’t see any clips or screws you may have an Amana or Whirlpool Maytag dryer.
3. Once the front is off remove the drum support by removing the four
screws.
4. Reach under the tub and disconnect the belt by pulling up on
the idler pulley to release tension. Then unhook it from the motor pulley.
5. Wrap the new belt around the drum with the grooves up.
6.
Pull the belt around the drum several times to ensure it is not twisted. Note
that if it is twisted the belt will jump off.
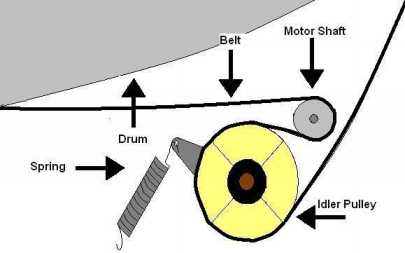
7. Hook the belt on the
motor pulley.
8. Pull up on the idler pulley and wrap the belt around
the pulley.
9. Reassemble the dryer.
You can find Maytag dryer belts at AppliancePartsPros.com.
The diagram below should help.
Return From Dryer Belt installation Guide