GE HydroWave Noisy Washer Repair Guide
In this GE washer repair guide I will walk you through the steps in repairing your noisy HydroWave washer. GE came out with the HydroWave around 2006 and is the quietest washer on the market for the money. But as with all machines it sometimes gets noisy and needs repair. This washer is basically like the older T model washers but without a transmission that makes it much quieter.
If you need a part You can enter your model number or part number here to search the part you need.
It’s easy! Just find the model number of the appliance you are working on. Next, type it in to the model number box and it will take you to an illustrated parts diagram for your appliance. Then just simply choose the part you need from the diagram. If you need help finding your model number click here
MODE SHIFTER
Sometimes called shifter coil or Shaft and tube assembly
This section of this HydroWave washer repair guide I will explain what the sifter coil is and why it will cause your washer to be noisy. The mode shifter has a cam that is lifted up for agitating and released it for spin. At the beginning of the agitation mode, the shifter coil energizes which lifts the cam up, allowing only the agitator to move during wash. If the shifter fails to lift the cam up, the whole tub will move during wash. This causes the washer to have a clanking noise when washing.
To check this, first remove the front panel by depressing the two clips located between the top and the front. Now start the washer into a wash cycle. You should be able to see the inter tub through the outer tub. If the inter tub doesn’t turn during agitation, click on the link below for more possible problems with your noisy GE washer. If the inter tub turns during agitation, the shifter coil may be bad.
To check the coil, first disconnect power from the washer. On the motor there will be four plugs, unplug the second on from the right; it should have only two wires. Then using your ohmmeter , check to see if you have continuity between the two wires that you just unplugged. If you do have continuity, replace the motor. If you don’t have continuity, the coil is bad and the mode shifter needs to be replaced. The part number for the mode shifter (shaft and tube) is WH38X10017 Order Here. The motor is best if ordered by model number and can be done here AppliancePartsPros.com
If you want to change the sifter coil on your GE washer this page will help GE Washer Disassembly Note that this page was created for the older style GE washers but disassembly is the same. Also that page shows how to remove the transmission on the older style GE washers and the same procedure applies to changing the sifter coil.
How To Check the Shifter Coil
In this section of this HydroWave washer repair guide I will talk about checking the sifter coil. All GE HydroWave washers have a shaft and tube as opposed to the old transmission. How this works is there is a sifter that shifts the washer from wash to spin mode. This is done with the sifter coil. The shifter coil is basically a solenoid that pulls up a set of gears that lock into another set of gears for wash mode and for spin mode it simply disengages. In other words, with the gears disengaged the spin basket turns with the agitator and with the gears engaged the agitator spins independently from the spin basket.
When the coil fails it can no longer engage the gears, therefore the gears stay disengaged all the time. This will cause the spin basket to turn with the agitator even during the wash cycle. This will make the washer become noisy during wash and it will not wash as it is designed to. Not to mention this is very rough on the machine in general because it is not designed to handle a full tub of water turning back and forth continually. Also this will cause motor to flag the four-flash error code, which stands for a failed shifter.
If your washer has the symptoms I described above more than likely the shifter has failed but there is a very slim chance the motor is causing this problem by not powering up the coil for wash mode. Check the sifter coil and if it is bad replace it and if not replace the motor. Follow these steps to check the shifter coil.
1. Disconnect power from the washer.
2. Remove the front off the washer.
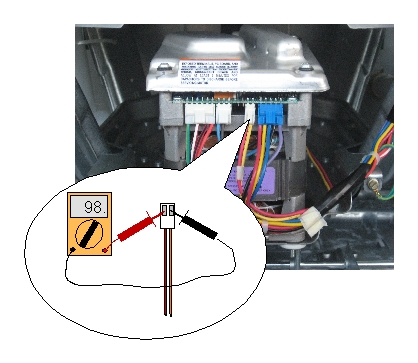
3. Disconnect the sifter coil from the motor. It will be the only plug with only two terminals. It will also be the third plug from the left. (see picture below)
4. Then test for continuity across the two wires. You should get around 98 ohms, the important thing is if it is open or not. If it is open replace the shaft and tube and if it is around 98 ohms replace the motor.
Sagging Apron
In this section of this GE HydroWave washer repair guide I will discuss the apron. On GE HydroWave washers sometimes the apron will sag. This will cause the bottom of the motor bracket to rub the bottom of the washer causing it to be noisy mainly on large loads. Another indication that you have this problem is that the front of the washer doesn’t stay on or won’t go on.
The apron is the metal bracket that extends from one side of the washer case to the other holding the washer tub up. To repair this you must install a Cover and Front Apron Bracket Repair Kit part number WH49X10065 Order Here for white color models and WH49X10066 Order Here for bisque color models. You will need a drill and a 1/8-inch bit. Instructions should come with the part. Also note that you will be replacing the top, which has the model/serial number tag. Don’t forget to transfer the tag from the old top to the new top.
As a side note this is a factory defect that I firmly believe that GE should repair for free. I recommend giving GE a call to see what they will do for you if you have this “sagging apron issue”

Loose Balance Weight
If your washer has a loud banging noise during spin the balance weight may be loose. This weight is to counter act the weight of the motor so you will find the weight directly behind the motor. Sometimes simply tightening the bolts will fix your issue but if the bolts are stripped out get some bolts slightly longer than the original bolt to allow you to put a locking nut on the bottom side of the mounting plate. If the weight is broken replace it with part #WH01X10643.
This is not the only thing that can cause the GE HydroWave washer to be noisy but I cover all the rest of the possible problems in Noisy GE Washer Repair Guide
For more on HydroWave washer repair see this page Hydrowave washer not running.
Return From GE Washer Repair Guide