Washer Agitator Repair Guide
This washer agitator repair guide will walk you through repairing three types of
agitators the: Whirlpool dual action agitators, GE agitators (made before 1995)
and GE agitators (made after 1995). The Whirlpool agitator has agitator dogs
that will strip out causing the top of the agitator to turn both ways. This
causes it not to mix the clothes properly resulting in poorly washed clothes.
The old style GE washer has an agitator spine up inside the agitator that
connects the agitator to the transmission shaft. This spine will sometimes strip
out. If this happens the agitator will not turn at all. The new style GE
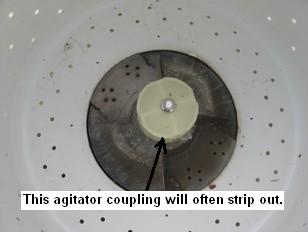
agitator has a coupling under the agitator that will also strip out. This will
also cause the agitator not to turn at all. Below are instructions for repairing
all three types.
Whirlpool Washer Agitator Repair
If the top of
your Whirlpool dual action agitator will turn both ways the agitator dogs are
stripped out.
1. Remove the cap or fabric softener dispenser off the top of the agitator.
2. Under that cap you should see another cap, remove it.
3.
Remove the 7/16 bolt down in the agitator that holds the agitator on.
4.
Pull the agitator up and out of the washer.
5. Down in the agitator you
should see two tabs that are bent over, straighten them out. Then separate the
top of the agitator from the bottom by simply pulling them apart.
6.
Once apart you should see the agitator dogs in a holder, remove them and install
the new ones.
When putting the agitator back together you must line up
the two tabs while holding down on the dog holder so that they won’t fall back
out. Once the tabs are lined up you should be able to push the agitator back
together. These parts can be purchased at AppliancePartsPros.com.
Whirlpool Washer Agitator Dogs Replacement Video
GE Washer Agitator Repair
New style
On the new style GE washers there is an
agitator coupling under the agitator that will sometimes strip out. To repair
this, remove the agitator by pulling it straight up and out.
Tip- if you can’t get your fingers under the agitator you can slip a belt under
the agitator and then pull by that.
Once the agitator is off you should
see a yellow coupling held on by a 7/16 bolt. Remove that bolt and pull the
coupling up and off the transmission shaft. Sometimes it will be hard to remove
and you might have to knock it up with a hammer. Once off you should be able to
slide the new on back on, bolt it down and push the agitator back on. Agitator
couplings can be purchased at AppliancePartsPros.com.
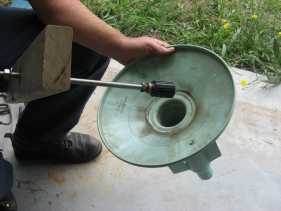
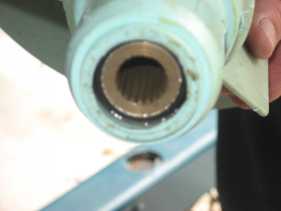
Old style
On GE old style
washers (made before 1995) the agitator has a spine inside the agitator that
will sometimes strip out. When this happens the agitator will not move. The
hardest part about this washer agitator repair is removing the old spine from
the agitator. They make a special tool that will make this easy but its not
practical for a do-it-yourselfer to buy a tool for a simple one-time job. I have
one of these tools but for the purpose of this website I went to my local
hardware store and purchased a few things to make my own tool for under $10.
While it is not nearly as good as the real tool it will get the job done.
Parts needed
One ½ inch threaded rod
One 3/8 by ¼ black iron
bushing
Two ½ inch hex nuts.
One ½ inch washer.
A scrap piece of 2X4
about 18 inches long.
1. Drill a ½ inch hole in the center of the 2X4 board.
2. Bolt the
2X4 to one end of the rod. Be sure it is tight or it will slip when you try to
turn it.
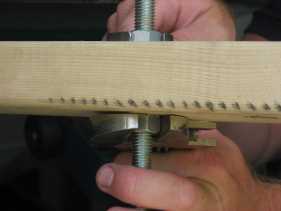
3. Screw the bushing onto the other end of the rod.
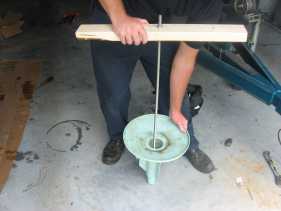
4. Insert the rod
into the agitator and screw the bushing into the agitator spine that needs
removing from the agitator. Use the 2X4 as a handle press down on it and twist.
Make sure it is tight so that it won’t slip out when you try to pull out the
agitator spine.
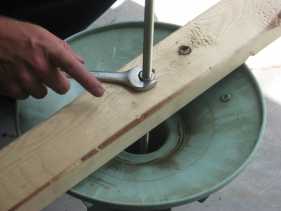
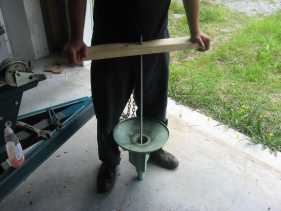
5. Unbolt the 2X4 and remove both nuts.
6. Slide the 2X4 down the rod to
the agitator.
7. Slide the washer to the 2X4.
8. Tread one of
the nuts down to the 2X4.
9. Continue to turn the nut until the agitator
spine pulls up and out.
10. Bolt the 2X4 back onto the rod as you did in step 2.
11. Screw the
new spine onto the bushing.
12. Lubricate the new rubber part of the new
spine with liquid soap so that it will press into the agitator easily.
13. Press the new spine into the agitator.
Agitator spines can be purchased at AppliancePartsPros.com. I hope this washer agitator repair guide helps you in repairing your agitator.
Return From Washer Agitator Repair Guide