Testing A Refrigerator Thermistor On A GE
Refrigerator
This page is for testing a refrigerator thermistor that is on a GE electronic refrigerator made after 2002 only. Including top-freezers, bottom-freezers, and side-by-side models.
Note that all thermistors on these refrigerators are the
same. This means that they will have the same part number no matter what part of
the refrigerator it is located. Also they are sometimes called a temperature
sensor.
Click Here To Order A Refrigerator Thermistor For A GE Refrigerator
These are a few other pages that will help you with your GE refrigerator
repair.
GE
Refrigerator Not Cooling
GE
Refrigerator Not Running
GE
Refrigerator Fan Motor
GE
Refrigerator Too Cold
When a refrigerator thermistor goes bad the refrigerator can become a lot less efficient, stop cooling completely or not defrost properly, depending on which thermistor is bad. This page will guide you on how to check these thermistors when you suspect they are bad.
Checking A GE Refrigerator Thermistor From The Main Board
You can check the refrigerator thermistor directly from the main board or you
can check them by cutting them out. Checking thermistors from the main board is
the best way, but the only thing is that it is a little complicated. If it is
too complicated for you there are directions on how to test a thermistor by
cutting it out at the bottom of this page.
The main thing is that if the refrigerator were cooling properly, you
wouldn’t be testing the thermistors. So you don’t know what the temperature of
the thermistor is. Placing the refrigerator thermistor in a cup of ice water
easily solves this problem. First, locate the thermistor (see pictures below),
once you locate the thermistor, place it into a cup of ice water (more ice than
water). You should be able to sit the cup on a shelf and place the thermistor in
the cup (make sure it is in the ice good). Then wait for at least five minutes
for the temperature of the thermistor to reach 32 degrees. If you do not test
the refrigerator thermistor with it in a cup of water you will not know what the
ohm reading should be. With the thermistor in a cup of water, the ohm reading
should be around 16.6 K ohms or 16,600 ohms +/-5%.
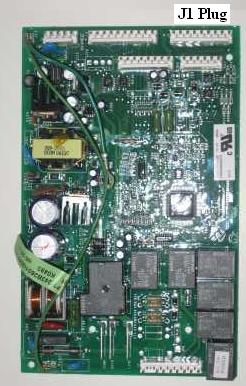
Next unplug the
refrigerator and locate the main board on the back of the refrigerator. There is
a plug marked J1 on the board and that is where the thermistors are connected.
There are 9 pins on that J1 plug. The first 5 are the ones for the thermistors,
one for each of the four thermistors and one common (connects to each
thermostor). Note that not all refrigerators will have four thermistors, in fact
most of them will only have three.
Evaporator Thermistor
The evaporator thermistor is the one attached to the top of the evaporator
coils in the freezer (see picture below).

The evaporator thermistor controls the defrost cycle, so if it is bad the
refrigerator will not defrost and the coils will look like this.

If you perform this test before you melt all the ice there is no need to place the thermistor in the cup of water because it is already wrapped in ice and it should be around 32 degrees and ready for testing. Disconnect the J1 plug and start the test. On the plug there are 9 pins. Place one lead of the ohmmeter on the fifth (counting from left to right) wire and the other on the fourth wire and it should read around 16.6 K ohms or 16,600 ohms +/-5%. Note that testing is done on the plug not the board and the plug must be disconnected so that you don’t get a false reading through the board.
If the coils look like and the thermistors test ok see this page GE
Refrigerator Not Cooling
Freezer and Fresh Food Thermistors
The freezer thermistor is located at the bottom of the freezer near the drain
pan (see picture below). The fresh food thermistors are in the fresh food
section and depending on the model they will be in different places. Some have
the thermistor at the top and it is connected to the damper. On other models
they are behind a little griddle on the sidewall of the refrigerator (see
picture below). The freezer thermistor, along with the fresh food thermistors,
will send signals to the main board so that it can determine when to turn the
compressor off/on, speed up/slow down/cut off the fans or open/close the damper.
If one of the thermistors is bad the refrigerator will not cool correctly.
If the refrigerator is not cooling properly and you suspect you have a
thermistor problem, it is best to test both the freezer thermistor and both of
the fresh food thermistors. Note that on most of these refrigerators there is
only one thermistor in the fresh food section.
Freezer
Thermistor
We will start with the freezer thermistors. Disconnect the J1 plug
and start the test. On the plug there are 9 pins. Place one lead of the ohmmeter
on the fifth (counting from left to right) wire and the other on the third wire
and it should read around 16.6 K ohms or 16,600 ohms +/-5%. Note that testing is
done on the plug not the board and the plug must be disconnected so that you
don’t get a false reading through the board.
Note that you will only get a 16.3 ohm reading if you have placed the
thermistor in the cup of ice water as previously mention at the top of this
page.

Fresh Food Thermistors
Next lets test the fresh food thermistors. Disconnect the J1 plug and
start the test. On the plug there are 9 pins. Place one lead of the ohmmeter on
the fifth (counting from left to right) wire and the other on the first and the
second wire (note that you may not have a second wire and if not, you only have
one fresh food thermistor). Both should read around 16.6 K ohms or 16,600 ohms
+/-5%. Note that testing is done on the plug not the board and the plug must be
disconnected so that you don’t get a false reading through the board.
Note that you will only get a 16.3 ohm reading if you have placed the
thermistor in the cup of ice water as previously mention at the top of this
page.

A Simpler Way To Check A Refrigerator
Thermistor
If this all confuses you there is a simpler way to check a refrigerator
thermistor. The problem with this way is you have to cut the wires and then if
the thermistor isn’t bad you have to reinstall the thermistor. On some of these
thermistors once you cut the wires you can’t reinstall it easily due to the
short wires.
Remove the thermistor and place it in a cup with ice and a small amount of
water for at least five minutes. This should bring the thermistor to 32 degrees.
Using your ohmmeter, check resistance across the thermistor with it still in the
ice water. It should read around 16.6 K ohms or 16,600 ohms +/-5%. If you don’t
own an ohmmeter or are unsure how to properly use it, replace the thermistors if
you suspect they are bad.
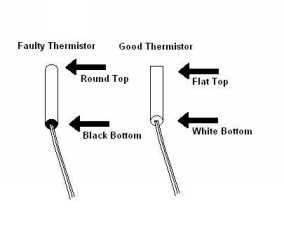
If your refrigerator was made before 2005,
this picture will help you identify faulty thermistors (thermistors that came
from the factory with a high failure rate). Refrigerators made after 2005 may
have thermistors that look like the one that says faulty but is ok. Because they
start back using a thermistor that looks like the faulty one but it is not
faulty.
Alternative Method For Testing A Refrigerator Thermistor
On this page I talk about testing thermisotors by placing it in a cup of ice
water to bring the temperature of the thermistor to 32 degrees (F). This is the
way I prefer testing thermistors and it is the way I recommend testing because
it gives you a very controlled test. However some people don’t like this method.
Here I give you an alternative method to testing thermisotrs.
Get an
accurate temperature reading close to the thermistor you will be testing. Then
at the main board test ohms across the thermistor using the pins described
above. Then look at the chart below to compare what ohm reading should be
according to the temperature at the thermistor. Note that it is important to
take ther temperature as close to the thermistor you wish to test as possible.
| Temperature (F) | Temperature (C) | Resistance |
| -13 | -25 | 65K Ohms |
| -4 | -20 | 48.4K Ohms |
| 5 | -15 | 36.4K Ohms |
| 14 | -10 | 27.6K Ohms |
| 23 | -5 | 21K Ohms |
| 32 | 0 | 16.3K Ohms |
| 41 | 5 | 12.7K Ohms |
| 50 | 10 | 10K Ohms |
| 59 | 15 | 7.8K Ohms |
| 68 | 20 | 6.2K Ohms |
| 77 | 25 | 5K Ohms |
| 86 | 30 | 4K Ohms |
| 95 | 35 | 3.2K Ohms |
| 104 | 40 | 2.6K Ohms |
Return From
Testing A Refrigerator Thermistor On A GE Refrigerator