Installing a Dishwasher
With the right tools and knowledge installing a dishwasher is easy. This page
will provide the knowledge needed for installing dishwashers. Dishwasher
installation varies a little with each model so this page is not meant to
replace dishwasher installation instructions given to you by the manufacture. It
is simply giving information to go along with your installation instruction, a
voice of experience if you will. So please read your dishwasher installation
instruction that come with your dishwasher. Also please follow all local
building codes when installing dishwashers! This dishwasher installation guide
is for if you are replacing an existing dishwasher only.
If you don’t need help with all aspects of installing a dishwasher you can skip
to the section you need by using these links.
Out With The Old
Water Line
Drain Line
Electric Line
In With The New
Test it Out
There are a few tools you will need for installing a dishwasher.
1. A
pair of pliers, preferably channel lock type but any will do.
2. A
Phillips screwdriver.
3. A straight screwdriver.
4. A ¼-inch
socket.
5. A 5/16-inch socket.
6. A 5/8-inch wrench, if you only
have an adjustable you can get by.
7. An adjustable wrench.
8. A
drill with a 1 ½ bit. Typically you will not need this when installing a
dishwasher but you may.
The first thing to do when installing a dishwasher is to remove the old
dishwasher.
1. Turn the water supply to the dishwasher off. It is
important you do this first!
2. Open the door of the dishwasher and make
sure there is no water in the tub. If there is water, attempt to pump it out. To
do this close the dishwasher and start the cycle. If the dishwasher has an
electronic control, push reset or cancel/drain. If the dishwasher has a
mechanical timer turn it slowly clockwise until the water starts to drain. If
the water will not pump out you will have to be careful not to spill all the
water out onto the floor. Some spillage is expected.
3. Disconnect power
from the dishwasher.
4. Remove the bottom panel of the dishwasher.
5. Disconnect the water line under the dishwasher.
6. Disconnect
the electric line. You have disconnected the power but it is best if you test
once more before taking the line loose!
7. Disconnect the drain line
under the sink. If you disconnect the drain under the dishwasher, water will
come pouring out even if you were able to pump the water out. If you couldn’t
pump the water out keep it tied up high until you have to pull it through the
hole. Then once it is through the hole pull it up to the top of the dishwasher
quickly to avoid draining the water in the floor.
8. Unscrew the
dishwasher. Typically there will be two screws at the top. Note that some models
have hidden screws that screw into the cabinet through a hole in the top of the
dishwasher at the front.
9. Pull the dishwasher out of the hole. This is
not as easy as it sounds. What you got to watch out for is the floor. If the
floor is vinyl or anything like that, you will have to make sure not to rip the
flooring. If the flooring is tile or wood you will have to make sure you don’t
scratch it.
Typically the flooring guys will install flooring up to the
dishwasher’s feet instead of removing the dishwasher and installing it all the
way. This creates a problem when removing the dishwasher. Sometimes it is
necessary to screw in the feet of the dishwasher to clear the flooring and
prevent damage to the floor. Most dishwashers are shaped in a way that you will
not have to screw in the back feet because once you pull it out the back will
come up enough to clear the floor. But on some dishwashers particularly old
Kitchen-Aid dishwashers you will have to screw in the back feet as
well.
Don’t get too focused on the floor that you don’t pay attention to
the counter top. On counter tops with formica covering you can damage it when
taking the old dishwasher out. If the brackets hang it can pop the formica off
so watch out for that.
The next thing to consider when installing a dishwasher is the water. Since you
are taking out an old dishwasher you already have a water line. You must make
sure the line is not corroded or old and prone to leakage. If you have line
larger than 3/8-inch O.D water line I recommend changing it to 3/8-inch O.D
line. You will have to install a reducer fitting to accommodate the smaller
line. Copper line is good but it is hard to hook up especially on some newer
dishwashers due to the limited room under them. What I recommend is going with
something flexible so that you can connect the line to the dishwasher before
sliding it into place. Use either 3/8 O.D plastic line or stainless steel
braided line such as this.
This allows you to connect the line to the dishwasher prior to the dishwasher
installation so you don’t have to fight to connect it under the dishwasher once
it is installed. Also it allows you to pull the dishwasher out for repairs
without disconnecting the water line.
Under the dishwasher, there is a
valve that has 3/8 female pipe threads. Your water line isn’t going to have male
pipe threads. It will have 3/8 compression fitting. You will have to install a
dishwasher fitting into the valve on the dishwasher. If you purchased the
braided line it will come with the dishwasher fitting. A dishwasher fitting is a
90-degree fitting with 3/8 male pipe threads (which will fit into the 3/8 female
on the valve) on one end and 3/8 compressions on the other end. Pipe threads
have to have either Teflon pipe thread tape or pipe dope. The tape is cheaper
and easier to use, just hold the tape on the fitting and rotate the fitting
clockwise wrapping the tape on the threads. Then screw the fitting into the
valve. Make sure it is in good and tight, use the adjustable wrench to screw it
into the valve tight. While you screw it, in hold the valve with the pliers so
you do not damage the valve.
The next thing to think about when installing a dishwasher is the drain line. Is
the hole in the cabinet large enough for the drain line to fit through? If not
drill a new hole. Make sure the hole is in the bottom back corner of the cabinet
so that it doesn’t hit anything when the dishwasher is installed.
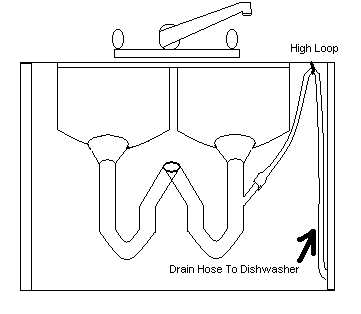
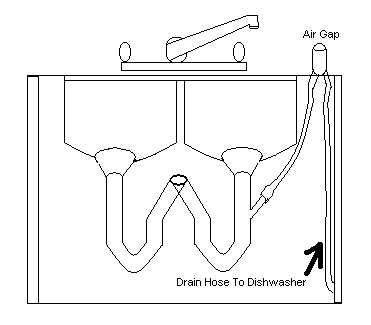
After
the dishwasher is installed, be sure that the dishwasher drain line has a high
loop as shown below unless it has an air gap. An air gap is just a vent that
goes up through the top of the sink. Air gaps are installed in a lot of mobile
homes and modular homes. Some local codes require an air gap so be sure to
follow local codes. High loops or air gaps are a absolute must when installing a
dishwasher.
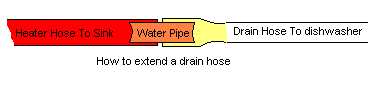
Sometimes it is necessary when installing a dishwasher to extend the drain line. Because sometimes the drain line isn’t long enough to reach due to the distance the dishwasher is installed from the sink. If this is the case you can use 5/8-inch I.D heater hose. The problem with using heater hose is that you will not be able to connect it to the dishwasher; you will have to connect it to the drain line that comes with the dishwasher. To do this get use a piece of 5/8-inch O.D water pipe about 3 inches long. Insert one end of the pipe into the heater hose and clamp it. Then insert the other end in the drain line to the dishwasher and clamp. Be sure to leave enough to make the high loop discussed above.
Note that if you are using the garbage disposer drain hook up make sure the plug
is knocked out of the inside of the disposer. If this isn’t done the dishwasher
will not drain. This is typically not a problem when you are replacing a
dishwasher but if you are installing a disposer at the same time or relocating
the drain hook up you will need to look out for this.
Make sure the power is disconnected at the switch box before installing a dishwasher.
The next thing to look at when installing a dishwasher is the electric line. Use
the existing electric line if possible. Make sure it is long enough to reach the
electric box on the dishwasher. Do not make connections outside of the
dishwasher’s electric box. If the line isn’t long enough you have two choices.
One is the move the dishwashers electric box back if possible. Some
dishwashers have a box that you can remove and relocate. I suggest moving it
straight back rather than moving it to the other side. Because dishwasher
manufactures locate the water valve and the electric box on opposite sides for a
reason.
Sometimes it is necessary to extend the electric line when
installing a dishwasher. To do this you will have to get a junction box. What
they call a handy box, which is just a 2x4x2 box, is sufficient because you are
only making one connection. You will need the box, two ½-inch romex connectors,
a blank cover and wire nuts. Make the connection in the box and place the cover
on the box. If you use a metal box you will have to ground the box with the
ground wire. Note that if you do not connect the electric wire correctly it can
be a fire hazard so if you are unsure seek professional help.
It is much
easier if you connect the electric line before the dishwasher is in place if the
line is long enough.
If you have followed this page well, you are ready for installing a dishwasher.
As I said before it is best if all connection such as water line, drain line and
electric line are connected before installing the dishwasher if possible. If
not, you will just have to do it after the dishwasher is in place.
Slip
the dishwasher into the hole and again look out for the floor and the
countertop. It is harder to rip the floor or crack the countertop when sliding
the dishwasher in but still watch out for this.
Raise the leveling feet
so that the dishwasher is just under the top of the counter. Do not raise it
enough that the door hits the countertop when closing. Level the dishwasher so
that it is not tilted backwards or forward. Also level it so that it is level
with the countertop.
Some dishwashers have to be level from side to side
for the door to close correctly. If this is the case, looks aren’t the top
priority. What I mean by that is that the dishwasher looks better if it is level
with the countertop but if that hampers the door closing you will have to level
it to the floor. Meaning it will be level but look un-level if the countertop or
the floor isn’t level. In other words level the dishwasher and don’t worry about
the countertop. If the floor and the countertop are level this isn’t a problem.
But sometimes this just isn’t the case. On some dishwashers, the door will close
no matter if it is level or not. In that case level the dishwasher the same as
the countertop for best look.
Attach the dishwasher to the cabinets so
that it doesn’t push back when closing the door and fall forward when the door
is opened. Most dishwashers have a bracket at the top to screw the dishwasher to
the cabinet you can use either one. If the bracket protrudes out past the
cabinet, you will have to break the bracket off if possible. Most dishwashers
have a break point to break the bracket off. Only attempt to break the bracket
off if you have to and be sure to smooth off any sharp edges that may cut
someone.
Some dishwashers have the option to use a hidden screw that
goes through a hole in the top of the dishwasher at the front. I caution you not
to use that hole unless absolutely necessary. If you do use this hole there is a
very good chance the screw will come back out due to the stress placed on the
bracket. The only way to use this hole (I don’t recommend it) is to put a board
under the countertop to lower down the bracket to relieve the stress on the
bracket. Trust me, I learned this the hard way.
Note that if you have
solid countertops like marble or granite, you will have to mount a board above
the dishwasher to have something to screw to. This will have to be done before
the dishwasher is in place. The best way to do this is to glue it to the top and
screw it to the front. Be sure the screws do not come through the front.
After installing a dishwasher it is important to test it. Some dishwashers
start the pump dry meaning it doesn’t run water before it starts the pump.
Typically, this isn’t a problem because a little water stays in the pump at all
times but when you first start it up, the pump will be running dry. Pour ½
gallon or so of water in the dishwasher to begin with to avoid damage to the
pump. Turn the water and electricity back on and start the cycle. Then look
under the dishwasher to check for leaks. Watch for leaks until the completion of
the first pump out to ensure the drain components do not leak.
Installing dishwashers isn’t hard so don’t get intimidated by all the
information on this page, I was just trying to cover every angle. Installing a
dishwasher is really not that hard just follow your dishwasher installation
instructions along with this page and you will install your dishwasher in no
time.
Return From Installing a Dishwasher