Dryer Vent Installation Guide
In this dryer vent installation guide I will walk you through the steps in
installing dryer vents. Dryers will not work properly if the vent is clogged or
is poorly installed. Dryer vents must be cleaned once a year after installation
to ensure proper airflow so that the dryer will work properly and safely.
Clogged dryer vents are a major fire hazard so be sure to clean them at
least once a year.
Planning
The very first thing you should do is to plan the dryer vent installation.
Plan how the vent is going to be run and how much vent you will need.
Choose the shortest straightest route for the vent to run. As a rule of
thumb, I try to keep vents below 20 feet if possible. Dryer manufacturers
recommend under 60 feet but every time there is a 90-degree turn you subtract
about 10 feet. So about 25 to 35 feet is all you can do. But keep in mind the
shorter the better.
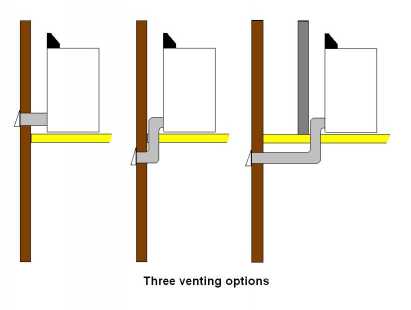
Decide if it would be best to go straight through
the wall (if the dryer is next to an outside wall) or if it is better to go
under the house and then out through the foundation. The down side of going
straight through the wall is you have to worry about hitting wiring or studs in
the wall and if you have vinyl siding it can be harder to get the dryer vent
hood to look and seal correctly. The good thing about going straight out the
wall is that the vent is straight and as short as possible. It is unlikely that
this vent system will ever clog. However regardless of how short the vent is you
must clean it out once a year. The good part about venting down under the house
then through the foundation is you don’t have to worry about hitting wires or
studs and foundations are usually brick or block so it is easy to get the dryer
vent hood to look right and seal correctly. The down side is that the vent is
going to be longer and have more bends to restrict airflow and the fact that you
have to knock a hole in brick, block or both which is not as hard as it sounds.
I will discuss venting through block walls below. If possible always
avoid running the vent upward and never vent a dryer through the roof of your
house unless it is absolutely no other way to go. Also note that if you do vent
the dryer through the roof or the vent runs upward I recommend cleaning the vent
every six months rather than a year.
Supplies
The next step in dryer vent installation is making sure you have all the
supplies needed.
Chose the type of vent you will use. There are four
basic types of vents: rigid metal, flexible metal, flexible plastic and flexible
foil.
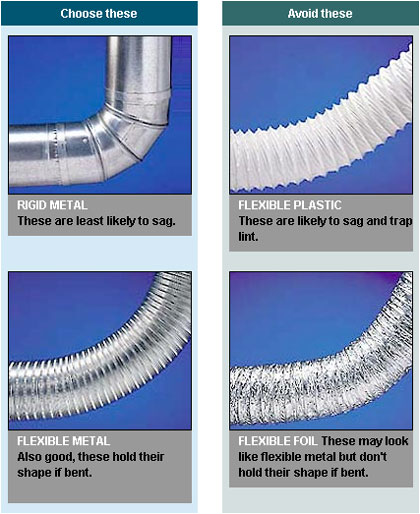
The rigid metal is the best but it has its limitations, it is very hard to run rigid metal all the way. The best way to do it is to run rigid metal most of the way then use a short length of flex. Flexible metal is the second best vent but it also has it limitations. It is very hard to work with and dryer vent clamps do not work well with this type of vent, it is best to use duct tape. Flexible foil and flexible plastic dryer vents are known to be a fire hazard and also on long runs they tend to sag and fill with water. I highly recommend using the rigid metal or flexible metal despite the limitations. Once you decide on the type of vent you will use, buy the length you determined in planning. Note that unless you are using rigid metal you shouldn’t piece together the dryer vent; it should be one continuous vent. Therefore it is wise to buy more vent than you think you need for the dryer vent installation. You will also need a vent hood to go on the outside wall of your house, long tie straps if you are making a long run, vent clamps and duct tape. These supplies can be purchased at AppliancePartsPros.com.
The Dryer Vent Installation Process
If you planned to vent the dryer straight through the wall, first you need to
carefully locate where the hole it going to be. Keep in mind you have wires and
studs in the wall. Once you located the place to cut the hole, take a piece of
the vent a trace it onto the wall. Then using a saw cut a hole along the line
through the first wall then drill a hole in the center through the outside wall
making sure you are center with the other hole. Then go outside and trace the
vent on the outside wall and cut a hole in the outside wall. If you have brick
on the outside of the house you will have to knock a hole with a hammer and
chisel. This is not as hard as it sounds. I still recommend drilling a small
hole first just so you know where there to start knocking. Read the section on
vent through brick walls.
If you are going to vent through the floor,
drill a hole through the floor then trace the vent and cut the hole out. You may
want to make this hole slightly larger than the vent so that you can pull the
vent through.
Venting Through a Brick Wall
This section of the dryer vent installation guide talks about venting through a brick wall. Most dryers vent through the foundation and most foundations are brick or block so it is likely you will have to vent through brick. You are going to need a big hammer and a chisel to knock a hole through the brick wall. Don’t worry it is not as hard as it sounds. If you are venting through a brick exterior wall you need to drill a small hole first just so you will know where to knock the hole. Trace the vent then use the hammer and chisel to mark the shape of the vent so that the brick will have a tendency to break off at the mark you make. Just take the hammer and hit the chisel a few good times slowly working all the way around the line you traced. Once you have a good mark take the hammer and just start hitting the center of the mark you chiseled repeatedly until you have a hole in the brick. Then continue to hit it until the hole is almost the size as the mark. Then use the chisel to make the final touches.
Running the Vent
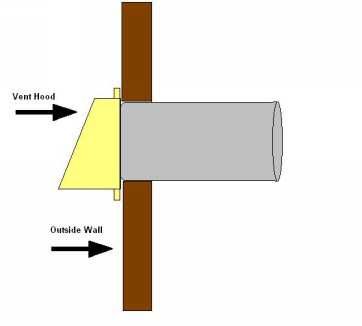
Once you have all the holes cut you need to mount the vent hood to the
outside of the house. Once done you can run the vent from the vent hood to the
dryer. Make sure the vent is secured with tie straps. You should be able to hang
it from the floor joists.
I hope this dryer vent installation guide help you vent your dryer safely and efficiently.
Return From Dryer Vent Installation Guide