Clogged
Drain Causes Leaking Refrigerators
If you have a leaking refrigerator, a clogged drain could cause it. This page shows how to repair this problem and prevent it from happing in the future. This is the most common cause for refrigerator leaks. When refrigerators run they collect moisture on the refrigeration lines in the freezer. This moisture freezes on the coils. Every 6-48 hours the refrigerator goes into a defrost cycle to melt this ice that develops during the cooling cycles. The water then flows down a drain into a pan where it evaporates before the next defrost cycle.
If the drain clogs the water will back up into the freezer. On top freezers this water will then run into the fresh food section and eventually into the floor. If left unattended, the water will eventually freeze in the air ducts causing the refrigerator to stop cooling due to poor airflow. On side-by-sides, bottom freezers and freezers (stand-alone freezers) the water will collect in the bottom of the freezer then once the bottom is full of ice, the water will run out of the door onto the floor.
Accessing The Drain
If you have a leaking refrigerator due to a clogged drain the first thing you must do is access the drain. Accessing the drain is different depending on the type of refrigerator you are working on. Scroll down to the type of refrigerator you have and read the section to learn how to access the drain.
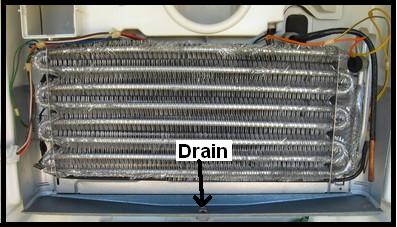
The drain will always be directly under the evaporator (freezer coils).
Side-By-Side
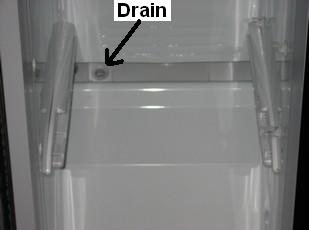
Accessing the drain on side-by-side refrigerators is for the most part very easy; sometimes the drain is accessible without turning a screw. Open the freezer door and look down in the bottom of the freezer and see if you can see your drain (see picture). If not you will have to remove the evaporator cover (cover in the back of the freezer). If you must remove the evaporator cover be sure to disconnect the power to the refrigerator.
Bottom-Freezers
Disconnect the power before attempting to access the drain.
The drain on bottom-freezers can be difficult to access depending on the model. On models with a drawer type door on the freezer you will have to remove the door to access the drain. Once the door is off, remove the evaporator cover (cover in back of freezer). Once the cover is off you will see the drain under the coils.
Top-Freezers
Accessing the drain on a top freezer is different depending on the model. A lot of newer (made since 2000) top freezers have a solid drain down the liner of the refrigerator, meaning that the only access point is in the freezer. On some newer models and almost all older models the drain comes out on the back of the refrigerator about halfway down.
Top-Freezer
Drain comes out the back
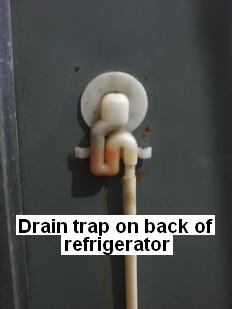
If your drain comes out the back the first thing you should access is the drain trap because this is a common clog point. If you remove the trap and find it to be clogged, you can unclog it with a water hose and your problem should be fixed. On some models you will have a drain cup inside the fresh food section (at the top; back; center) sometimes this cup will clog.
Top-Freezer
No Drain out the back
If your drain doesn’t come out of the back on your top-freezer refrigerator you must assess the drain from the freezer. Remove the evaporator cover from out the back of the freezer. Once the cover is off you should see the drain under the evaporator.
Unclogging The Drain
If you have a leaking refrigerator due to a clogged drain, once you access the drain you must unclog it and this is the same regardless of what model you are working on with the exception of some top-freezers. If you have a clogged drain on a top-freezer with a drain trap on the back refer to the section above titled top-freezer drain out back.
First, remove the ice covering the drain.
If the drain is clogged there will almost always be ice on top of the drain.
Using hot water, melt all the ice on top of the drain.
Once the ice is removed from the drain unclog the drain. The easiest and best way to unclog a drain is with a turkey baser. Fill the baser with hot water and forcefully spray the water down the drain until water flows freely.
Once water flows freely you must clean the drain. There are two things that effectively clean leaking refrigerator drains and they are bleach and baking soda. I usually use baking soda. If you use bleach, mix half and half with water and pour about two cups down the drain. If you use baking soda mix ¼ soda with ¾ water and pour about two cups down the drain.
Heat Exchanger
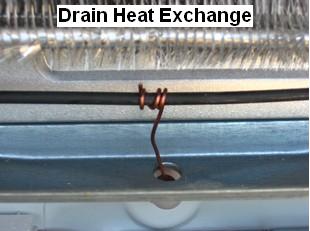
Sometimes you will need to add a heat exchanger to prevent a clogged drain. Note that is not necessary in most cases but if your drain keeps clogging this is something to try. Also note that this can only be done if your refrigerator is equipped with a Calrod (metal) defrost heater. Do not attempt this if you have a glass heater.
Take a piece of copper wire and wrap it around the defrost heater then place the other end of the wire inside the drain. This will conduct heat to the drain when the refrigerator is in defrost-mode to melt the ice that will clog the drain.
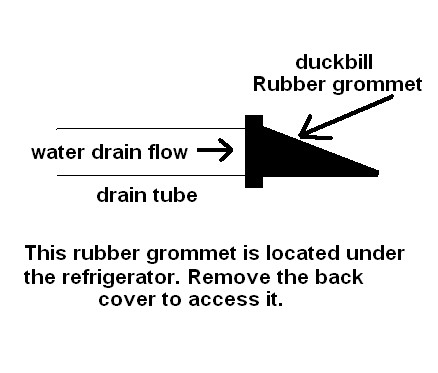
Rubber Duckbill On Drain Clogged
Some refrigerators have a rubber grommet sometimes
called a duckbill (because of the shape) often this will clog causing the drain
to back up and leak. This is a design flaw on Whirlpool (Whirlpool made) refrigerators so they
came out with a repair kit to correct this problem. The part # W10619951. This kit
contains a drain trap that replaces the duckbill.
Return from Clogged Drain Causes Leaking Refrigerators