Oven Self-Clean Cycle Problems
Using the clean cycle feature on your oven comes with a risk of causing an oven failure. I will not go so far as to tell you not to use self-cleaning because ovens are designed to withstand the self-clean cycle however; during self-clean all the components of the oven are under far more stress as compared to a normal cooking cycle. This is due to the fact that an oven cleaning cycle heats up the oven to just under 900 degrees as opposed to an average cooking cycle at a mere 350 degrees.
Sometimes self-cleaning oven clean cycle causes problems and other times it forces an inevitable problem to occur during the cycle. For example, if the bake or the broil elements is on the verge of failing, running a self cleaning oven cycle will most likely cause the element to fail right then rather than three weeks from now. On the other hand running the clean cycle may cause a safety thermostat to trip, which would have never tripped in a normal cooking cycle. This is why it is very common oven repairs to be necessary following a cleaning cycle.
Checking an oven that failed just after or during a clean cycle is not unlike checking an oven any other time but there are some commonly occurring failures that sometimes take place during a clean cycle. Below I break down these failures so you have a better understanding of what to do.
Hint: if both the bake and the broil aren’t working check the components on this page in order, however if one element works but the other doesn’t skip down to the bake and broil section first.
Door Latch Switch
If when you try to use your oven after running a clean cycle the control panel displays Lock, LOC, Door Locked or the lights are just flashing, the door latch switch should be checked fist.
When you lock the door for self-clean the latch makes a connection on a switch that lets the control know the door is locked and it can start the cycle. The same goes for models that lock automatically.
Often during a cleaning the contacts in the switch will stick. If this happens you will still be able to unlock the door (or it will unlock automatically) but the control still “thinks” the door is locked and will not start a cooking cycle.
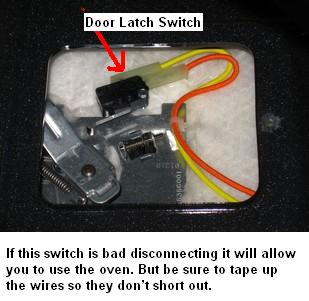
On almost all models with a manual lock you can simply disconnect the door latch switch and the range will go back to work as normal while you are waiting for the door switch to arrive. Everything will work with this switch disconnected but you will not be able to run another cleaning cycle until the switch is replaced. If you disconnect this switch be sure to tape up the wires so they cannot short out and disconnect the power to the range before attempting to disconnect or reconnect any wires.
On automatic locking models there will be two switches; one for telling the control the door is locked and one for telling the control the door is fully unlocked. The first thing you need to do is check to see if the door latch mechanism is pressing on one of the switches, if not you can be almost sure you will need to replace the whole mechanism. If the mechanism is pressing the switch, replace both switches.
Door Latch Mechanism
If when you try to use your oven after running a clean cycle the control panel displays Lock, LOC, Door Locked or the lights are just flashing, the door latch mechanism may be bad.
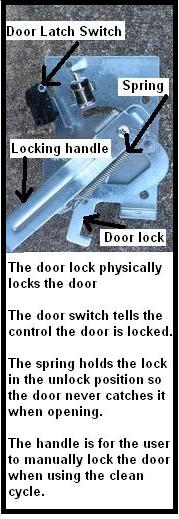
When an oven is in a self-clean cycle the temperature will reach just below 900 degrees. Once the temperature gets above 500 degrees, the door latch will not allow the user to unlock the door even if you have a manual latch. If you cancel the cycle or it comes to an end you still will not be able to open the door until the temperature gets back down below 500 degrees.
Almost every time I see a manual latch mechanism fail it is because the user failed to wait until the oven temperature dropped below 500 degrees before attempting to open the door, therefore it doesn’t unlock, so they force it. What ends up happening is they bend the latch and it will still be pressing the door latch switch mechanically, yet the door will physically be unlocked. This will give the same issue talked about above in the door latch switch section. However, regardless of how the latch got bent the latch must be replaced.
On automatic locking models confirm that the mechanism is pressing one of the switches when the door is unlocked and the other when the door is locked. If not replace the latch.
As a side note, some latches come as an assembly (switch and all), however some come in parts. If this is the case you will have to figure out which parts are needed to make the repair. If possible it is best to buy the whole assembly.
Accessing The Door Latch
Locate the door latch. On most freestanding ranges all you have to do is lift up the top (this may require removing screws on glass-top models). Once the top is up you should see a panel that covers the door latch mechanism just above the center of the door.
On built-in ovens accessing the latch can be a little trickier. On built-in ovens access the door latch by removing the control panel. Before removing the control panel move the rack in the oven to the highest position. When you remove the control panel you should have enough slack in the wires to rest the control on the rack.
Hi-Limit Thermostat
Hi-limit thermostats are thermostats that disable the bake and broil elements in the event they over heat. This will happen if the controls stick or sometimes during a self-clean cycle. Hi-limit thermostats are on most (if not all) built-in self-cleaning ovens. However, they are on very few freestanding ranges. On built in ovens the thermostat will be located on the back (behind a cover) or on top (inside the control panel).
To check them, disconnect the power to the range/oven and remove the wires off the thermostat. Then using an ohmmeter test for continuity across the terminals on the thermostat. If it is open replace it.
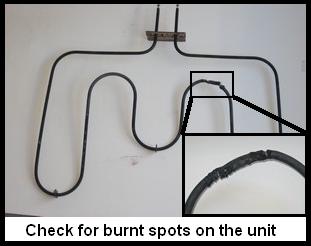
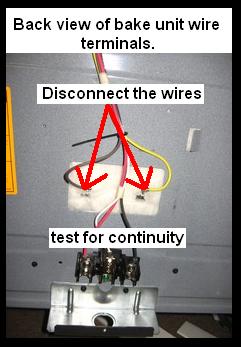
Bake and broil Elements
As I said the elements are under a lot more stress during a self-clean cycle. Sometimes this will cause them to burn out. To check this, look for physical breaks or burnt out places on the element. If you don’t see any, you will have to access the back of the oven or remove the element to test them with an ohmmeter. Be sure to disconnect power before attempting to remove, test or replace an element.
Hint: if both the bake and broil elements are not working check the components talked about above first, but if only one element isn’t working check the element first.
 |
 |
Control
Your self-cleaning oven has one of two kinds of controls and they are a mechanical thermostat or an electronic control. Sometimes after a self-clean these controls will fail. This is especially true with the electronic control model due to the high heat and/or the constant current draw of the elements to maintain the extreme high temperatures required for self-clean. This seems to be the least common issue associated with a clean cycle but if you check all other issues mentioned above and don’t find the problem the control is likely the problem.
Return From Oven Clean Cycle Problems