Whirlpool Washer Lid Switch Repair And Replacement
In this Whirlpool washer lid switch repair guide, I will walk you through testing and replacing lid switches on whirlpool direct drive washers as well as the new belt driven models known as the VMW or vertical modular washer.
If you are unsure if your washer is a VMW or a direct drive its simple, if your model has a lid lock then you have a VMW model and if not you more than likely have a direct drive model.
Whirlpool Washer Lid Switch Repair For Direct Drive Models
Whirlpool washer lid switch failures are along some of the most common direct drive washer problems I run across in the field. This section will help you diagnose and replace lid switches.
If your Whirlpool direct drive washer will fill with water, agitate but will not spin, the lid switch may be bad. Some models are designed to only wash with the lid down; therefore, yours may not wash or spin and still have a lid switch problem.
The quickest way to diagnose a Whirlpool washer lid switch is to place the washer into a spin mode, open the lid then insert a screwdriver down into the lid switch actuator whole. If the washer will run when you do this but will not run with the lid closed, then you know the lid switch is bad. What happens is the lid switch will come apart causing the actuator to be pressed down further in order to make the contacts in the switch. Eventually the actuator on the lid will not press the switch far enough to make the switch contacts but when you press a screwdriver down into the hole you make the switch.
If this test fails to produce a result, you will have to perform a continuity test with an ohmmeter.
Disconnect power to the washer.
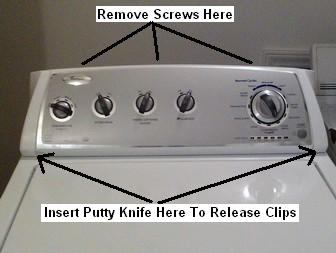
Access the control panel. Removing two screws on each end of the control panel does this. On some models the screws are on the back, on some models the screws are on the front exposed and on some models the screws are on the front behind a cover. Some models don’t have screws to access the control panel so, take a putty knife and force it under the front corners of the control panel to release the clips.
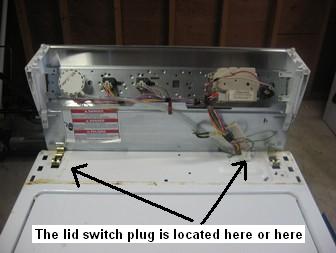
Once you have accessed the control panel you will see a plug going into the washer case in the center or on some models you will see the lid switch on the left-hand side. In either case there will be a three-wire plug, disconnect this plug.
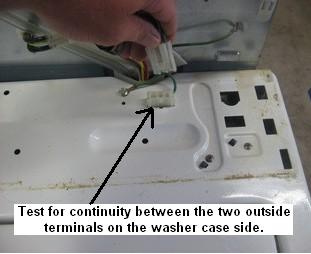
Using an ohmmeter test for continuity between the two outside wires on the plug (on the washer case side). Be sure this test is being done with the lid closed. If you have continuity then the switch is ok and if the circuit is open then the lid switch is bad.
From here all you have to do in order to replace a Whirlpool washer lid switch is remove the two brass clips that hold the case of the washer in place and remove the case. Once the case is removed you can access the lid switch and replace it.
For more help watch this Whirlpool washer lid switch repair video I made.
Whirlpool Washer Lid Switch Repair For VMW Models
If you get no response when you press the start button on your VMW model then the lid lock may be your problem.
The Whirlpool VMW washer utilizes a lid lock, which locks the lid during operation. The lid lock is a safety device to protect the operator from harm. Because the washer doesn’t have brakes it takes up to 30 seconds for the washer tub to come to a stop, which can be dangerous for anyone that opens the lid during a spin cycle. On washers that have brakes (such as the direct drive models) the tub will come to a complete stop within a few seconds posing no threat to the operator. Therefore, washers with brakes don’t need locks and washers with locks don’t need brakes.
The lid lock consists of a lid switch, a lock switch, a lock solenoid and a locking mechanism. The lid switch senses when the lid is down, which tells the control board that it can initiate a cycle or lock the lid. Once the lid is closed and a cycle is started, the control will send voltage to the lock solenoid to lock the lid. Once the lid is locked, the lock switch will sense the lid is locked and the lid lock light will be illuminated on the control panel. If any of these components fail, the lid will not lock and the washer will not start a cycle. To test the lid lock mechanism disconnect power and access control board.
Note that before you test the lid lock, make sure the lid lock strike isn’t broken. The strike is located on the lid itself and if it breaks the lid will not lock. If this is the case replace the strike.
Also note that if someone has forced the lid open when the lid was locked the mechanism is broken in the switch internally and cannot be tested. If this is the case replace the lid lock.
Once you have accessed the control locate and disconnect the plug on the board marked J15. The J15 plug will be a four-wire plug with a red, white, blue and yellow wire.
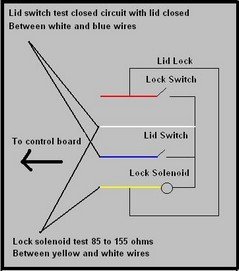
The first test you perform is the lid switch test. With the lid down, test for continuity between the white wire and the blue wire. If the circuit is open replace the lid lock.
The next test is the lid lock solenoid. Test for ohms between the white and yellow wires. You should get between 85 and 155 ohms. If not replace the lid lock.
The lid lock switch cannot be tested but if it were bad the control will attempt to lock the door and the door will actually lock. However, the lid lock switch will not “tell” the board the lid is locked therefore the lid lock light will not illuminate and the control will not start the cycle. To sum it up if the lid lock light will not illuminate but the lid does lock then the lid lock switch is more than likely bad.
Accessing The Lid Lock
This section of the Whirlpool washer lid switch repair guide I will walk you through accessing the lid lock on a whirlpool VMW modes for replacement. To access the lid lock you must lift the top of the washer up, to do so follow these instructions.
First disconnect power to washer.
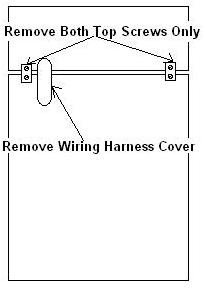
Next pull the washer out to access the rear of the washer. On the back of the washer you will see a wiring harness-cover, remove it.
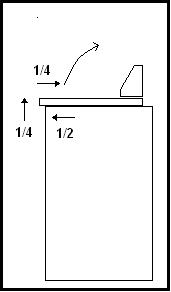
Now, go back around to the front of the washer and pull the top forward about ½ inch.
Then lift up on the top about ¼ inch.
While still keeping the top up ¼ inch, push it back about ¼ inch and it should release. Once it releases you should be able to tilt the top up on the rear hinges.
Return From Whirlpool Washer Lid Switch Repair And Replacement