Whirlpool Clothes Dryer Disassembly Guide
Whirlpool clothes dryer disassembly is easy and this guide will walk you through
the steps in doing so. Use this page along with my Dryer Repair
Guide and your dryer will be repaired in no time. There are two main types
of Whirlpool dryers and disassembly is different for each. The easiest way to
identify which of the two you have is the location of the lint trap. On one
type, the lint trap is located on top of the dryer and the lint trap for the
other type is located in the dryer door.
Lint Trap On Top
This section will
discuss Whirlpool clothes dryer disassembly on the Whirlpool clothes dryers with
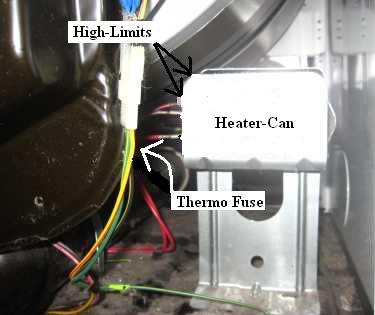
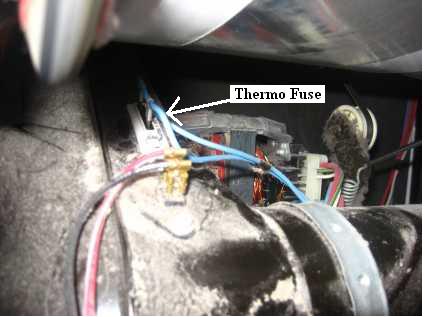
the lint trap on top. On this Whirlpool dryer the heating element, hi-limit
thermostats, thermo fuse and the operating thermostats are located on the back
of the dryer.
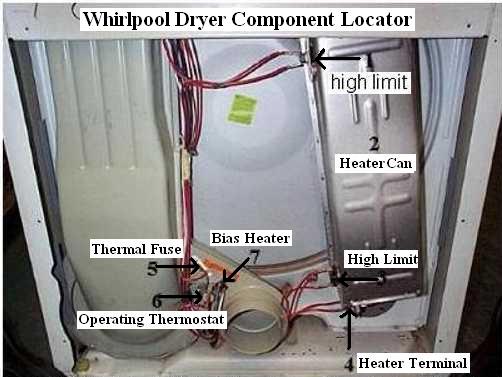
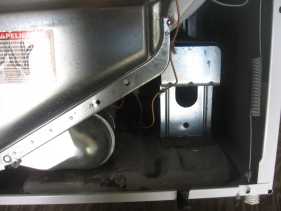
Be sure to disconnect power before attempting to disassemble it. To access
them simply remove the back cover. On the right hand side you should see the
heater-can (a metal can with the heating element inside). There are two types of
heating elements that these dryers can have. One is attached the outside of the
heater-can and all you do to replace it is remove the screws and the heating
element comes right off. If you see screws on each side of the bottom half of
the heater-can, your dyer has this type of heating element. The other type of
heating element is mounded inside the heater-can. The heater-can must be removed
to replace the heating element. Follow these steps to replace this type of
heating element.
1. Disconnect power from dryer.
2. Unplug the
wires from the heating element.
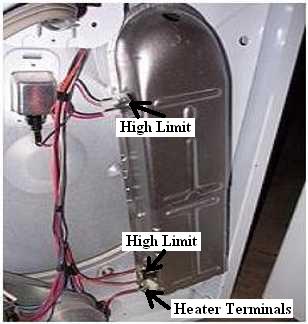
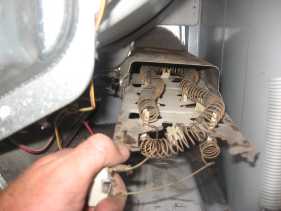
3. Remove the hi-limit thermostats from
the heater-can. Note there is no need to disconnect the wires but you can if you
like.
4. There is a screw at the top of the heater-can that must be
removed. The heater-can extends above the case so it is hard to access this
screw. On some models there is a hole that lines up perfectly with this screw by
using a 5/16 socket with a long extension, reach through the hole and remove the
screw. Note if there is no hole you will have to use a ratchet with a short
extension and remove the screw from behind the case.
Note that on newer models you don’t have to remove the whole heater-can. The element detaches halfway down the heater-can and screws hold it on.
Buy
appliance parts online and save.
5. Once the screw is removed pull out on the
top of the heater-can and lift up on it to remove it.
6. Once the
heater-can is out there is a 5/16 screw at the bottom of the heater-can, remove
it and slide the heating element out of the heater-can.
7. Slip the new
heating element back into the heater-can and reverse instructions for
reassembly.
On these types of Whirlpool clothes dryers you must remove the front and top
to access the drum, belt, rollers, motor and blower. To do so follow these
steps.
1. Disconnect power from the dryer.
2. Remove the lint
trap.
3. Once the lint trap is out, remove the two screws under the lint
trap.
4. Pull the top forward while lifting up on the front of the top.
The top should release from the clips on the front and the front should hinge
up.
5. Remove the screws that point toward the front that holds the
front on.
6. Unplug the door switch.
7. Pull the front forward a
few inches and lift it up.
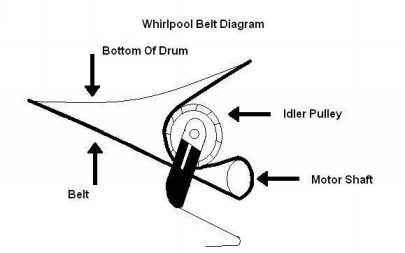
Once the front is off, look under the tub and
you should see the belt and idler pulley. To remove the belt, push the idler
pulley to the right to release the belt tension. Then remove the
belt.
This diagram will help with installing the belt on this type
whirlpool dryer.
Lint Trap In Door
This
section will discuss Whirlpool clothes dryer disassembly on the Whirlpool
clothes dryers with the lint trap in the door. Disconnect power before
attempting to dissemble the dryer. Unlike the other type, these types dryers
everything (except all the control parts) is located inside the dryer case
including the heating element. But all you have to remove to access the heating
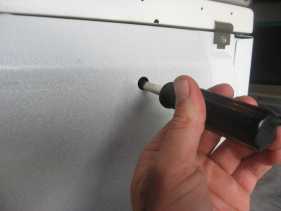
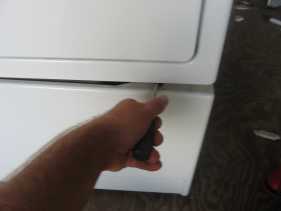
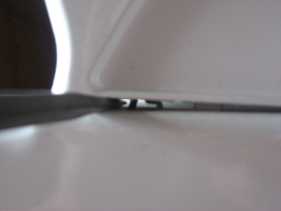
element is the front bottom panel. To remove the front panel, press in on the
two clips under the door as shown.
Then remove the heat deflector and the screw at the front of the heater-can. Once done, you should be able to pull the heating element out of the heater-can.
To access the other internal parts you must remove the front panel. To do so
follow these steps.
1. Disconnect power from dryer.
Note that on
some models you don’t have to hinge up the control panel, just press in on clips
at the front top to release the top so skip steps 2 and 3 if you have one of
these models.
2. Hinge up the control panel. Depending on the model you might have to
remove two screws on each end of the control panel or press in on two clips as
shown.
3. Remove the top by removing the screws under the front panel. On some
models you don’t hinge the control panel up, you just press in on two clips at
the front (between the front and the top) to release the top.
4. Unplug
the door switch.
5. Remove the two screws pointing forward that hold the
front on.
6. Remove the two screws at the bottom.
7. On some
models you will have to remove screws that hold the air-duct to the blower.
Others you just have to remove a clip at the bottom of the air-duct.
Once the front is off you can reach under the tub and disconnect the
belt and remove the tub if necessary.
Return From Whirlpool Clothes Dryer Disassembly Guide