Ge washer is Leaking and Noisy
If your GE washer is leaking and noisy the most common problem is that the washer tub seal is leaking. When the washer tub seal leaks, the water then runs down the transmission (or tube depending on the model) and onto the washer bearing and once this bearing gets wet, it becomes very noisy during spin. Some people describe it as sounding like a freight train.
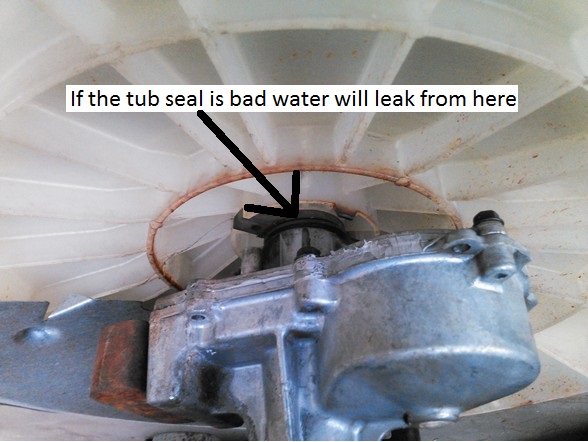
The first thing you need to do is to confirm that the tub seal is your problem. To do this remove the front and start a cycle then look at the bottom of the tub where the transmission shaft enters the tub. That is where it will leak if the tub seal is bad. Note that most of the time this seal will not leak until the washer starts to wash and sometimes it will not leak until it spins the first time then fills up again for the rinse cycle. Also remember you may only be looking for one or two drops of water every few minutes.
Ge Tub Seal and Bearing replacement
Once you determine that the tub seal is your problem, you
must replace the tub seal (part number WH02X10032). Replacing the seal will
only fix the leak and the washer will still be noisy; nobody likes a noisy
washer. To repair the noise issue you will have to replace the washer bearing.
This bearing is embedded in the bottom portion of the drive system. You can
replace the drive system or you can replace just the bearing. Replacing the
bearings on the drive systems is a lot cheaper but it is more labor intensive,
requiring more tools and may not be suited for some do-it-yourselfers while
others may not have a problem with this repair (instructions below). If you
decide to replace the drive system, the seal is included so there is no need to
order it. Some models have transmissions and some just have a shaft and tube so
you will need to look yours up by model number.
Washer Tub Seal Replacement
The tools you will need for disassembly are putty knife, ¼ inch socket, 7/16 inch socket, 5/16 inch socket, 3/8 inch socket, ½ inch socket, large hammer (preferably 2lbs) a ¾ wrench (or adjustable) and a spanner wrench. The spanner wrench can be purchased here
You can also use spanner wrench made by GE part number WX5X1325 which is a little more expensive but will last and work better however the average do-it-yourselfer will only use it once so I would recommend the cheaper one in the link.
Remove the drive system. Refer to this page for instructions on doing so GE Washer Disassembly
Once the drive system is out, turn the tub upside down and knock the seal out. Reinstall the drive system.
Note that if you are replacing the drive system, simply install the new one; however, if you are replacing the washer bearing now is the time to start that and you can come back to this section when you are ready to reinstall.
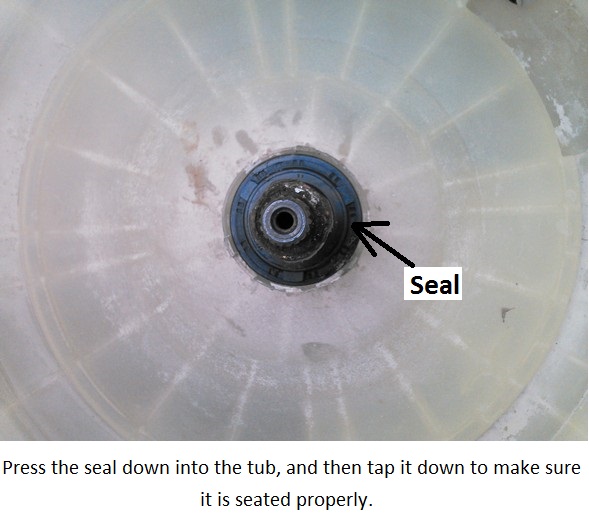
When reassembling the washer, once you get everything assembled on the bottom, flip the washer tub back over and install the new seal. Press the seal down flush with the cup it fits into. Then take a blunt object like a ¼ extension and tap it a few times with a hammer to make sure it is down all the way. Don’t use a screwdriver because it will dig into the seal. Then finish reassembly.
Replacing The Washer Bearing
If your GE washer is leaking, noisy and you need to replace the bearing, look at the pictures below to determine if your machine has a shaft and tube drive system or a transmission drive system.
Shaft and Tube models
The tools you will need for the entire job are putty knife, ¼ inch socket, 7/16 inch socket, 5/16 inch socket, 3/8 inch socket, ½ inch socket, large hammer (preferably 2lbs), a ¾ wrench (or adjustable), a spanner wrench a puller tool, a smaller hammer and two screwdrivers. The spanner wrench can be purchased here
You can also use spanner wrench made by GE part number WX5X1325 which is a little more expensive but will last and work better however the average do-it-yourselfer will only use it once so I would recommend the cheaper one in the link.
The part number for the bearing is 6006-RS
You may think you can complete this job without the puller tool and you may be right but you run the risk of damaging the tube if you try to remove the bearing with a hammer.
If your GE washer is leaking, and noisy you will have to replace the bearing after you fix your leak follow the instructions below for shaft and tube models.
Note that as you dissemble the shaft and tube; place each part on a table in the order in which they are removed so that you can keep up with how they go back for reassembly.

1. Remove the clip on the bottom of the shaft.
2. Once done you can remove the white cap and the top half of the shifter hub (includes the top connector and the spring.)
3. Remove the shifter coil (the part with the wire connected). It just lifts right up after you take the wire tie out. Be careful with the coil not to nick the wire.
4. Remove the bottom half of the shifter hub. Make sure the plastic washer stays with it.
5. Using a hammer, knock the bottom housing off the bearing leaving the bearing on the shaft.
6. Place the nut that holds the belt pulley on the shaft upside down.
7. Using a puller tool, pull the bearing off the shaft. Note that when you do this the inside shaft will push into the outer shaft until it hits the nut. This is ok; we can put that back in place later.
8. Once the bearing is removed lube the shaft to make the new bearing slide on easier.
9. Tap the bearing on with a hammer to get it started.
10. Place the bottom housing on the bearing and drive the bearing and the housing onto the shaft. When you do this the bearing should seat on the housing at the same time so make sure the housing is turned the correct way. Use a cloth to minimize the damage you cause to the housing while driving it down.
11. When you are driving the bearing onto the shaft with the hammer, you most likely made burrs on the aluminum housing where the coil and the shifter fits into. Use a file and file it back in shape or the coil will not fit back correctly.
12. Once the bearing is down on the shaft all the way drive the bottom of the shifter back in place. Note the grooves in the shaft will line up with the ridges on the shifter.
13. Now drive the inner back into the outer shaft until it feels solid. Then push the seal back into the top of the tube. You can tap it back in with a large deep socket.
14. Install the shifter coil (part with the wire). Note the pins on the bottom of the coil will line up with the holes in the housing and the coil must fit all the way down flush with the housing.
15. Now reinstall the spring and the top part of the shifter hub.
16. Finally, reinstall the white top and the clip.
Transmission Models
If your GE washer is leaking, and noisy you will have to replace the bearing after you fix your leak follow the instructions below transmission models.
The tools you will need for the entire job are putty knife, ¼ inch socket, 7/16 inch socket, 5/16 inch socket, 3/8 inch socket, ½ inch socket, large hammer (preferably 2lbs), a ¾ wrench (or adjustable), a spanner wrench, an old knife, a smaller hammer, two flat bars, four c-clamps and two screwdrivers. The spanner wrench can be purchased here
You can also use spanner wrench made by GE part number WX5X1325 which is a little more expensive but will last and work better however the average do-it-yourselfer will only use it once so I would recommend the cheaper one in the link.
The part number for the bearing for the transmission models is 6205-2RS-1
Note that as you dissemble the bottom half of the transmission, place each part on a table in the order in which they are removed so that you can keep up with how they go back for reassembly.
Disassembly
- Remove brake friction pad and set it aside.
- Remove the large spring off the hub. If you twist the spring to the right it should slip right off.
- Remove the hub. The hub is in two halves, the pulley hub and the cam hub. Using a knife (not a good knife because this may damage your knife) as a wedge drive it between the two hubs. This should raise the top hub up enough to prize it up with a screwdriver. Once the pulley hub is off you can just pull the cam hub off easily.
- Once the cam hub is off you will see 6 ball bearings. Remove these bearings and put them aside. (Careful not to lose these bearings as they are very easy to loose and they are very important).
- Remove the retaining ring that holds the bottom half of the cam and the brake disk. Then pull off the brake disk.
- Remove the brake spring assembly.
- Remove the bearing housing off the transmission. Then knock the bearing out the housing.
Reassembly
- When GE installs the bearing at the factory they make crimps on the housing to hold the bearing in place. The new bearing will go in easier if you file the crimps down a bit. Don’t worry about not having the crimps to secure the bearing because once you get it together, the bearing can’t go anywhere. When you drive the new bearing down into the housing be careful to only hit the outer race on the bearing because hitting the center may cause damage to the bearing.
- Reinstall the housing and the spring assembly.
- Next reinstall the brake disk. Notice the three holes in the brake disk, these holes should line up with the three springs. At this point all you want to do is slide the disk down until it touches the springs.
- For this next step you will need two long flat metal bars (two files may work or anything you may have lying around) and four c-clamps. Lay the two flat bars across the disk and place one c-clamp on each end of the two bars. Tighten all four clamps evenly until the disk is fully compressed, exposing the groove that the retaining ring fits into. Once this is done, reinstalling the retaining ring will be easy. Once you get the ring onto the shaft simply, push it down until it snaps into the grove.
- Next clean the old grease out of the cams (where you got the ball bearings from).
- Place a dab of white lithium grease or an all purpose grease in each of the cams and place each bearing in the cams.
- Reinstall the cam hub. Note that the top cam notch should be to the left of the cam notch on the bottom hub. If you place it on the wrong side your brakes will not work, therefore the tub will spin during the agitation cycle. (Trust me I made this mistake once before).
- Reinstall the pulley hub and the spring.
- Reinstall the friction pad. You should have two large holes in the pad that line up with the two large holes in the housing. When these holes line up the four screw holes will be lined up. I recommend taping this pad in place until you reinstall the transmission.
Return from Ge washer is leaking and noisy repair guide