Noisy Frigidaire Dryer Repair Guide
This noisy Frigidaire dryer repair guide will help with repairing your noisy
Frigidaire dryer. This page talks about common failures that make a Frigidaire
dryer noisy. When a dryer is noisy it can be very irritating and eventually the
dryer will fail completely, it is just a matter of time. Ignoring this can lead
to serious problems for your dryer down the road. The two most common things
that cause these dryers to be noisy are the drum bearing and the top glides.
This noisy Frigidaire dryer repair guide will tell you how to diagnose and
replace these parts.
Drum Bearing
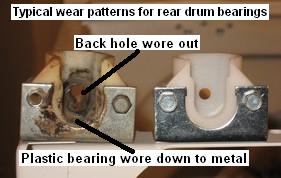
This section on the noisy Frigidaire dryer repair guide talks about the drum bearing. The drum bearing is the most common thing to cause these dryers to become noisy. It is located at the rear of the drum of the dryer. It is basically a shaft that fits into a bearing (what amounts to a cup). This shaft that rides in this bearing supports the drum. A metal bracket holds on the bearing and when the bearing wears down to the point that the shaft is touching the metal, you will get a loud metal-to-metal noise.
To access the tub-bearing follow the steps below.
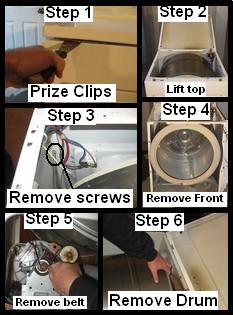
1. Disconnect power to dryer.
2. Lift the top of the dryer by
pressing in on the clips with a putty knife.
3. Remove the front by
removing the two screws inside the dryer that point forward holding the front
on. Then prize the front off.
4. Remove this plastic yellow drum stop.
5. Disconnect the belt.
6. Remove the drum by lifting straight
up on the rear of the drum. You cannot pull forward because the shaft must lift
out of the bearing.
Once the bearing is accessed it will be
obvious if it is bad or not. A bad bearing will be worn down to the metal.
This section on the noisy Frigidaire dryer repair guide will show how to replace
the bearings.
1. Remove the screws that hold the bearing in place and remove the old
bearing.
2. Get the new bearing and bracket and hold them together as
they will be on the dryer.
3. Find the grounding ball (small metal ball)
and hold it to the hole in the back of the bearing.
4. Hold the bearing,
bracket and ball in place up against the back of the dryer where it is to be
mounted.
5. Push the screws through the bracket and the back of the
dryer.
6. Have someone hold the nut plate in place at the rear of the
dyer while you tighten the screws.
The drum-bearing shaft must be replaced as well. Three screws inside the drum
hold it on. Tip: These screws can be very hard to turn so it is very important
you use the correct fitting Phillips head screwdriver because if you don’t you
can damage the screw head and it will not come out. Also before you install the
new bearing shaft you may want to tap the screws into the holes first.
Top Glides
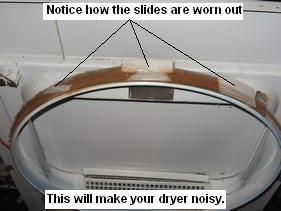
In this section of the noisy Frigidaire dryer repair guide we will talk about
the top glides and how to replace them if they fail. On the front of the dryer
drum there is a felt seal all the way around the drum. At the top of this felt
are three glide bearings. The three bearings are attached to a separate felt
than the bottom felt seal. Over time these glide seals will wear down eventually
wearing away completely. If the glides are wore down or are completely gone you
should replace them. To access the glides follow these steps.
1. Disconnect power to dryer.
2. Lift the top of the dryer by
pressing in on the clips with a putty knife.
3. Remove the front by
removing the two screws inside the dryer that point forward holding the front
on. Then prize the front off.
To replace the glides
follow these steps.
1. Remove the old felt.
2. Scrap of the old glue that held the felt in place. This can be aided by
using a cleaner such as acetone.
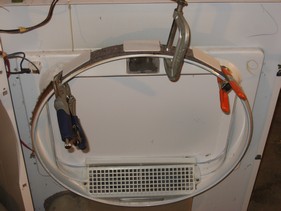
3. Put a sufficient amount of glue on the new felt and press it in place. At
this point you can simply put the front back in place allowing the drum to hold
the felt in place as the glue dries (don’t turn the dryer on for a while).
However, what I like to do a lot of times is place three clamps on the felt to
hold it in place while the glue dries. This way you don’t have to worry about
the felt slipping out of place or someone coming along and turning the dryer on.
4. Once the glue dries (three hours should be fine) you can put the dryer
back together and into use.
Return From Noisy Frigidaire Dryer Repair Guide